Tuesday, December 18, 2012

Prevent a postback from triggering on a button control when the Enter key is pressed

If you would like to prevent a postback from occurring on an ASP button control whenever the user presses the "Enter" key, one possible option for overriding this functionality is to add "UseSubmitButton = false" as an attribute/property of the appropriate button controls as follows:

<asp:Button id="btnSubmit" runat="server" UseSubmitBehavior="false" ... />

or

Button btnSubmit = new Button();
btnSubmit.UseSubmitBehavior = false;

In case you're curious, the reason we were asked to do this was due to a problem that our users were encountering with a postback being triggered on the "wrong" command button in our gridview control whenever a user would hit the "Enter" key.  Essentially, our gridview's rows contained several command button controls that, when clicked, would perform a variety of activities on the given row depending on which button was clicked.  Naturally, the first button on the selected row, the button with the focus, would be triggered whenever the user hit the "Enter" key; therefore, we all came to conclusion that the best route was to simply disable the "Enter" key postback functionality across all of the button controls contained in the gridview.

Monday, December 17, 2012

SharePoint List Filter web parts not displaying on a SharePoint 2010 Page in Edit mode

Our Business Analyst and I recently ran into an interesting problem in which we were attempting to install a couple of SharePoint List Filter and Apply Filters Button web parts on a page that would help users filter items in a connected list.


After adding the required web parts, our BA noticed that these controls were not appearing on the page as he would have expected despite the fact that the page was undoubtedly in Edit mode.  As a result, he wasn't able to configure the newly added filter web parts as well as set their connections to the associated list web part.


Anyway, I just happened to place the list view web part that these parts were supposed to connect to in Edit Web Part mode and, voilĂ , all of the filtered web parts suddenly appeared on the page.


At that point, our BA was able to proceed with his configuration and connection work without issue.


Thought it would be nice to share just in case anyone out there happens to encounter the same situation.

Tuesday, December 11, 2012

Obtaining custom configuration settings from a web.config for a Visual Web Part

If you're looking for a possible route for obtaining special configuration settings/information for a Visual Web Part that will be consistent across all sites contained under a given SharePoint Web Application, one possible route is to reference those configuration settings from the <appSettings> node of the web application's web.config file.  NOTE:  Only pursue this route if you know beyond a shadow of a doubt that the config settings will be consistent across all sites contained within the given web application.  If there is even a remote chance that you'll need to adjust those settings for each given site, you will wish to pursue another route for configuring your web part such as adding a custom property.  With that said, I'll now proceed with the steps you can use to make this possible:

Add the Custom Configuration Settings to the Web.config

Before you deploy you're web part, you will wish to open the web.config files for each of the SharePoint web applications under which your SharePoint web part will be deployed and add the new configuration setting to the <appSettings> node.  On your SharePoint Web Front End (WFE) server(s), the web applications will be located under the C:\inetpub\wwwroot\wss\VirtualDirectories directory and the web.config file will be located immediately under each given web application.  In this particular instance, I'm going to reference a custom setting called "dbConnectionString" which is presented as follows:

<?xml version="1.0" encoding="utf-8" standalone="yes"?>
<configuration>
  <configSections>
  ...
  <appSettings>
    <add key="dbConnectionString" value="Data Source=dbServer;Initial Catalog=dbName;Integrated Security=True" />
  </appSettings>
</configuration>

After making the change, be sure to save the updated web.config file and, now, we move on to actually putting this info to good use...

Referencing the Custom Configuration Settings

To reference the custom configuration settings in your Visual Web Part, you will need to carry out the following steps:
  1. Open your Visual Web Part in Visual Studio
  2. In Solution Explorer, expand the Project tree, right-click on References and select Add Reference...
  3. Click on the .NET tab
  4. Locate and click on the System.Configuration component
  5. Click OK
  6. Open your Visual Web Part's .ascx.cs file
  7. Add the following code that will reference the custom configuration setting:
using System.Configuration; using System.Web.Configuration; ...
protected void Page_Load(object sender, EventArgs e) {     if (!IsPostBack)     {         string dbConnectionString = string.Empty;         string errorMessage = string.Empty;         try         {             using (SPSite site = SPContext.Current.Site)             {                 Configuration config = WebConfigurationManager.OpenWebConfiguration("/", site.WebApplication.Name);                 if (config.AppSettings.Settings["dbConnectionString"] != null)                 {                     dbConnectionString = config.AppSettings.Settings["dbConnectionString"].Value;                 }                 else                 {                     throw new Exception(string.Format("The 'dbConnectionString' <appSettings> node could not be located in the web application's, {0}, web.config file.", site.WebApplication.Name));                 }             }             ... Do something with the configuration info         }         catch (Exception ex)         {             ...Handle the exception properly         }     } }
At this point, you can now deploy your web part to sites contained under the web applications that you added the custom setting to (via updating the web.config file, of course) and they will reference the value that you've specified.

Tuesday, November 27, 2012

Programmatically obtain an SPUser object from a SharePoint "Person or Group" field

Within a document library that's contained in our custom Team Site template, we have defined a custom content type (i.e. called Enterprise Document) in which we've specified a "Person or Group" field called "Owner" to store the person who has overall responsibility of the document and may be different from the person who created or last modified the document. The value of this field is set by the user who uploads the document to the library. Naturally, I would like to put this field to use and obtain information about the user that is defined in this field in one of our custom workflows.  In this sample case, I'm going to obtain the owner's email address:

SPList docLibrary = web.Lists["Enterprise Documents"];
SPQuery query = new SPQuery();
query.Query = "<where><eq><fieldref name="ContentType"><value type="Text">Enterpise Document</value></fieldref></eq></where>";
SPListItemCollection documents = docLibrary.GetItems(query);
foreach (SPListItem doc in documents)
{
    if (doc.Fields["Owner"] != null)
    {
        SPFieldUser ownerField = doc.Fields.GetField("Owner") as SPFieldUser;
        SPFieldUserValue ownerValue = ownerField.GetFieldValue(doc[ownerField.Id].ToString()) as SPFieldUserValue;
        SPUser owner = ownerValue.User;
        string ownersEmail = owner.Email;
        ...

Because we have multiple content types in this library, I added code to make certain that the content type of the document under review is based on our custom "Enterprise Document" content type since only that content type contains the "Owner" field mentioned above.  Anyway, I thought this might be useful to share since it took me several iterations before I figured it out.

Monday, November 26, 2012

Adding configuration settings to a custom SharePoint timer job

If you wish to add custom configuration settings to a custom SharePoint, web application scoped timer job, one possible option is to add those configuration settings into the <appSettings> node of the web.config file of the applicable SharePoint web application(s) and then reference those settings from your custom SharePoint timer job's code.

Your first step is to add your configuration settings into the <appSettings> node of your SharePoint web application.  The custom configuration settings can be added to your web.config file via the following steps:
  1. Log on to your SharePoint WFE server(s)
  2. Open Windows Explorer
  3. Navigate to the C:\inetpub\wwwroot\wss\VirtualDirectories folder
  4. Locate the applicable SharePoint web application listed here and open on that folder
  5. Right-click on the web.config file and select Open with -> Notepad
  6. Scroll down until you find the <appSettings> node
  7. Add a new element within the <appSettings> node to define the key and value of your configuration setting (i.e. "<add key="hoursToExpiration" value="10200" />")
  8. Click File -> Save
  9. Repeat steps 1 - 8 for all web applications that your timer job is activated on
Your next step is to add code to your timer job's class file, that will reference your custom <applicationSettings> elements.  The following code sample provides one possible option for obtaining these settings using my sample "hoursToExpiration" setting:

...
using System.Configuration;
using System.Web.Configuration;
...
public override void Execute(Guid contentDbId)
{
    int hoursToExpiration = 0;
    Configuration config = WebConfigurationManager.OpenWebConfiguration("/", this.WebApplication.Name);
    if (config.AppSettings.Settings["hoursToExpiration"] != null)
    {
        if (!Int32.TryParse(config.AppSettings.Settings["hoursToExpiration"].Value, out hoursToExpiration))
        {
            // Write code to handle that the custom appSetting couldn't be converted to the appropriate data type
        }
    }
    else
    {
        // Write code to handle that the custom appSetting couldn't be found
        ...

Once you've deployed the code update, be certain to cycle the SharePoint timer service to make certain that the change has been picked up (see my previous blog entry for instruction on how to do that).  At that point, your timer job will obtain the custom setting information upon execution of the timer job on that web application.

Thursday, November 22, 2012

Custom SharePoint timer job code doesn't seem to be updating

If you're running into a situation in which your making code updates to a custom SharePoint timer job and the code doesn't seem to be updating, you may want to try restarting the OWS Timer service to see if that helps resolve your issue.  To restart the OWS Timer service on SharePoint 2010, you can perform the following steps:
  1. Open the SharePoint 2010 Management Shell as an administrator 
  2. Enter “net stop SPTimerV4” and press enter. (The service will be stopped)
  3. Enter “net start SPTimerV4” and press enter. (The service will be started again)
In my particular example, I had just deployed a code update to one of the custom timer jobs on my SharePoint farm and, upon attaching the debugger to the OWSTimer, noticed that the debugger was simply skipping over the new lines of code that I had just added.  Anyway, refreshing the OWS Timer service made certain that the latest code I had just deployed was refreshed.  As a result, the debugger immediately started picking up the new lines associated with the code that I had previously deployed.

Wednesday, November 21, 2012

Adding a description to a custom SharePoint timer job

If you've ever dug through a bunch of SharePoint timer jobs installed on a SharePoint farm wondering what the purpose of a given job is as well as why the Description field always seems to be blank for the custom timer jobs, I feel your pain and would like to offer you a potential solution to this problem.


The most likely reason that the Description field is blank for custom timer jobs is because the property associated with it is read-only. To make a long story short, the property only has a "get", but no "set" operation; therefore, the developer of the custom timer job can't set the text of that property directly. To overcome this issue, you or your developer will need to do three things:
  1. Create a custom property, CustomDescription, in the custom timer job's class which will reference a private field, m_description
  2. Override the Description property and have it obtain the value of your custom description's private field, m_description
  3. Set the value of the CustomDescription property in each of the timer job's constructors
Here is some sample code that highlights all of the steps within my custom timer job called EmailNotificationTimerJob as follows:

class EmailNotificationTimerJob : SPJobDefinition
{
    private string m_description;
    public override string Description
    {
        get
        {
            return m_description;
        }
    }

    public string CustomDescription
    {
        get
        {
            return m_description;
        }
        set
        {
            m_description = value;
        }
    }

    public EmailNotificationTimerJob() : base()
    {
        this.Title = "CHCO Doc Retention - Email Notifications";
        this.CustomDescription = "This timer job will be used to send email notifications to users who are responsible for documents that are about to expire";
    }

    public EmailNotificationTimerJob(string jobName, SPService service, SPServer server, SPJobLockType targetType)
        : base(jobName, service, server, targetType)
    {
        this.Title = "CHCO Doc Retention - Email Notifications";
        this.CustomDescription = "This timer job will be used to send email notifications to users who are responsible for documents that are about to expire";
    }

    public EmailNotificationTimerJob(string jobName, SPWebApplication webApplication)
        : base(jobName, webApplication, null, SPJobLockType.ContentDatabase)
    {
        this.Title = "CHCO Doc Retention - Email Notifications";
        this.CustomDescription = "This timer job will be used to send email notifications to users who are responsible for documents that are about to expire";
    }

    ...

Once you have deployed the timer job code and performed an IISReset on the farm, your SharePoint Admins will now be provided with a description of the custom timer job on the Edit Timer Job page as follows:


Monday, November 19, 2012

Adding time to a DateTime value obtained via a SQL SELECT query

If you're looking for a good way to add a fixed duration of time to a DateTime value obtained in a SQL SELECT query, the following example provides the Transact-SQL code that can do this:

DECLARE @DurationTillExpire INT
SET @DurationTillExpire = 1

SELECT 
   dbo.Documents.DocumentId,
   dbo.Documents.LastModifiedDateTime, 
   (SELECT DATEADD(hour, @DurationTillExpire, dbo.Documents.LastModifiedDateTime)) AS 'ExpirationDateTime'
FROM dbo.Documents

In this example, I'm obtaining values from a table called Documents and am simply adding one hour to the DateTime column called LastModifiedDateTime and placing that value in a new column called ExpirationDateTime.  Of course, you may require a different duration such as days, months, or years and can account for this by adjusting the first parameter of the DATEADD function appropriately (see http://msdn.microsoft.com/en-us/library/ms186819.aspx for more info).

Thursday, November 8, 2012

Hide/Display the form ribbon on an InfoPath 2010 form

On one of our SharePoint 2010 Team Sites, we're currently leveraging a custom InfoPath 2010 form to override the look and feel of the form that's used for creating/modifying items in one of our SharePoint lists as well as perform several custom actions during the form's Save operation which is controlled by button clicks.  As a result, we no longer need the ribbon and, in fact, would prefer to remove it since it's causing more problems and confusion.


In order to hide the ribbon, you may do so via InfoPath 2010 as follows:

  1. Using IE, navigate to your List view
  2. Under the List Tools tab, click on the List tab
  3. Click on the Customize Form ribbon item
  4. Once InfoPath Designer opens, click on File -> Info -> Form Options
  5. To completely remove the ribbon, uncheck the Show InfoPath command in Ribbon or toolbar checkbox
  6. Click OK
  7. Save the changes and publish your form
Once these steps are complete, the ribbon will no longer appear on the form whenever a user creates/modifies a list item.

Thursday, November 1, 2012

Programmatically creating a custom hyperlink within a content editor web part

Not certain how useful this is; however, I was recently asked if I could update the title of a web part hosting a view to a SharePoint list so that it would not only be larger, but would also incorporate the upcoming date of the next weekly meeting in the title's text.  The solution I decided to implement for this particular site consisted of the following activities:
  1. Set the Appearance -> Chrome Type of the list web part to "None" in order to hide the existing title of the list web part
  2. Added a new Content Editor Web Part immediately above the applicable list web part
  3. Used Notepad to create a javascript file, OutstandingRCATitle.txt, that would create the custom hyperlink within the content editor web part
  4. Uploaded the custom javascript file to the Site Assets library of the given SharePoint site
  5. Linked the content editor web part to this file via the Content Link parameter of the content editor web part
With that accomplished, I simply had to add the appropriate javascript code to the OutstandingRCATitle.txt file in the Site Assets library to provide the requested functionality.  This functionality is listed as follows:
  1. Increase the size of the link to make it stand out to the users (i.e. used <h1> for this purpose)
  2. Append the date of the next weekly team meeting to the link (i.e. the meeting always takes place on a Tuesday so I created code that would add additional days to the current date so that the upcoming Tuesday's date would be listed)
  3. Have the link reference the appropriate view to the list (i.e. I maintained the link to the original AllItems.aspx view of the list; however, you could specify another view)
Here is the javascript code that I used for meeting this particular user's needs:
<script language="javascript"> var now = new Date(); var todaysDay = new Date().getDay(); var nextTuesdaysDate = new Date(); var numDays; switch (todaysDay) { case 0 : numDays = 2; break; case 1 : numDays = 1; break; case 2 : numDays = 0; break; case 3 : numDays = 6; break; case 4 : numDays = 5; break; case 5 : numDays = 4; break; case 6 : numDays = 3; break; } nextTuesdaysDate.setDate(now.getDate() + numDays); var displayDate = "<h1><a href='../Lists/Outage/AllItems.aspx' class='customLink'>Outstanding RCAs to be reviewed on " + nextTuesdaysDate.toLocaleDateString() +"</a></h1>"; document.write(displayDate); </script>
Since this was a one-time request for a particular user (i.e. a priority one at that) and not something that would be applicable to multiple sites, I decided to use this solution; however, I would have used a radically different approach to solving this problem if this was something that was required across multiple sites.  Not certain how useful this might be to others, but I thought I'd share anyway.

Wednesday, October 24, 2012

Adding a custom CSS file to your Visual Web Part

If you would like to add a custom CSS file to a Visual Web Part that allows the styling of the web part to remain consistent no matter where it's installed, you can do so via the following steps:

  1. Using Visual Studio 2010, open your Visual Web Part solution
  2. In Solution Explorer, right-click on the project and select Add -> SharePoint "Layouts" Mapped Folder
  3. Right-click on the newly created Layouts folder and select Add -> New Folder
  4. Edit the name from "NewFolder1" to "1033"
  5. Right-click on the "1033" folder and select Add -> New Folder
  6. Edit the name from "NewFolder1" to "Styles"
  7. Right-click on the "Styles" folder and select Add -> New Folder
  8. Edit the name from "NewFolder1" to the name of your Project (i.e. MyProject in this example)
  9. Right-click on the "MyProject" folder and select Add -> New Item...
  10. Under the Installed Templates section, expand Visual C# and click on Web
  11. Click on the Style Sheet icon, update the name of your style sheet (i.e. Standard.css in this example), and click Add
  12. You may now enter the appropriate style sheet rules in this file and save the changes
During the deployment of your Visual Web Part, the custom style sheet will be deployed directly to the SharePoint farm under the following location on the web front end servers:  C:\Program Files\Common Files\Microsoft Shared\Web Server Extensions\14\TEMPLATE\LAYOUTS\1033\STYLES\MyProject.

Now, to reference the style sheet in your Visual Web Part, you may do so via the following steps:
  1. Open your Visual Web Parts .ascx file
  2. After the "<%@ Control" tag, add the following line:  <SharePoint:CssLink ID="cssLink1" runat="server" DefaultUrl="MyProject/Standard.css" />
  3. Save the change
At this point, you will be able to reference the new style sheet within the controls on your .ascx page.

Wednesday, October 17, 2012

Programmatically locating and cancelling running workflows associated with a content type

If you're looking for a way to programmatically cancel all running workflows associated with a specific content type (i.e. a custom content type called "Enterprise Document" is highlighted in this example) across all of the document libraries contained within a given site collection, I've put together some code that can do this as follows:

Guid siteId = new Guid("siteIdGuid");
using (SPSite site = new SPSite(siteId))
{
    foreach (SPWeb web in site.AllWebs)
    {
        // Only iterate through document libraries since this content type is associated with documents
        foreach (SPList list in web.GetListsOfType(SPBaseType.DocumentLibrary))
        {
            // Make certain the content type exists in the library so you don't waste cycles stepping through a document library that doesn't contain it
            SPContentType ctEntDoc = list.ContentTypes["Enterprise Document"];
            if (ctEntDoc != null)
            {
                foreach (SPListItem item in list.Items)
                {
                    // Only cancel active workflows that are associated with items of this content type
                    if (item.ContentType.Name == "Enterprise Document")
                    {
                        SPWorkflowManager mgr = site.WorkflowManager;
                        SPWorkflowCollection activeWFs = mgr.GetItemActiveWorkflows(item);
                        foreach (SPWorkflow activeWF in activeWFs)
                        {
                            SPWorkflowManager.CancelWorkflow(activeWF);
                        }
                    }
                }
            }
        }
    }
}


Tuesday, October 16, 2012

Good technique for programmatically deleting items from SharePoint collections

If you're attempting to delete items from a SharePoint collection (i.e. this could include containers such as lists, groups, document libraries, workflow collections, etc), you'll often encounter a situation where you'll need to iterate through a given collection in order to find the appropriate item (i.e. using a "for" or "foreach" loop) and then delete that specific item.  Now, if you happen delete an item from the collection while you're iterating through it, your code will thrown an error message that will stop the process dead in its tracks due to the fact that you've actually changed the contents of the collection while your also in the process of looping through the contents.  Here is an example scenario in which I'm attempting to remove a given task list called "Expired Items Tasks" from a site:

Incorrect Code:

foreach (SPList expiredItemTaskList in web.GetListsOfType(SPBaseType.GenericList))
{
    if (expiredItemTaskList.Title == "Expired Item Tasks")
    {
        expiredItemsTaskList.Delete();
    }
}


This code will throw an error (i.e. often times "Collection was modified; enumeration operation may not execute") on the next iteration of the loop that takes place after you're deleted the selected item and will stop the process dead in it's tracks.  For your code to properly handle this scenario, a good strategy will be to temporarily store the specific object(s) targeted for deletion in a generic list until you've completed iteration process.  Once you've completed your review of the collection, you can then delete those objects at your liesure:

Correct Code:

List<SPList> listsToDelete = new List<SPList>();
foreach (SPList expiredItemTaskList in web.GetListsOfType(SPBaseType.GenericList))
{
    if (expiredItemTaskList.Title == "Expired Item Tasks")
    {
        listsToDelete.Add(expiredItemTaskList);
    }
}

foreach (SPList expiredItemsTaskList in listsToDelete)
{
    expiredItemsTaskList.Delete();
}

Anyway, I've run into this scenario on many occasions with other .NET code; however, I've found this scenario to be more prevalent in SharePoint due to the fact that most objects contained within it are collections.  Hope this helps!

Thursday, October 11, 2012

Allowing a Windows Forms Application to manage SharePoint 2010

If you'd like to create a Windows Forms Application that a power user (i.e. perhaps a Business Analyst who isn't versed in PowerShell, but has a high level of access to the SharePoint Farm) could use for administering functionality on your SharePoint farm that isn't covered by standard tools, there are a few steps that you'll need to carry out first before your application will run on the farm.  After creating your Windows Forms Application, the first thing you'll need to do is add a reference to the Microsoft.SharePoint.dll file.  This can be accomplished via the following steps:
  1. Using Visual Studio 2010, open your Windows application solution
  2. Expand the tree under your solution in the Solution Explorer view
  3. Under your project, right-click on References and select Add Reference...
  4. There will be two routes you can pursue for adding the assembly based on your development environment:
  • If your developing on an environment with SharePoint installed, you can reference the assembly via the following steps:
    1. Click on the .NET tab
    2. Locate and click on the Microsoft.SharePoint item
    3. Click OK
  • If you don't have SharePoint installed in your environment, you can reference the assembly via the following steps:
    1. Obtain the assembly via the steps that I've covered in my blog post titled Accessing files contained in the Global Assembly Cache
    2. Create a new folder in your project called "External Assemblies"
    3. Add the Microsoft.SharePoint.dll file to the new folder
    4. Under your project, right-click on References and select Add Reference...
    5. Click on the Browse tab
    6. Navigate to the "External Assemblies" folder
    7. Click on the Microsoft.SharePoint.dll file
    8. Click OK
Once you've associated the SharePoint assembly, the next step will be to make certain your Windows application can run in a 64 bit environment if your app is going to be accessing SharePoint 2010.  By the way, if you don't follow these steps, your code will throw an error message that reads "Object reference not set to an instance of an object".  Here are the steps that will allow your app to run in a 64 bit environment: 
  1. In the Solution Explorer view, right-click on the project and select Properties
  2. Under General, locate the Platform target: dropdown and change the value from "x86" to "Any CPU"

  3. Save the change and build your solution
At this point in time, your Windows application will now be able to run directly on one of your SharePoint WFE servers in order to carry out the admin activities that your power user would like it to execute.

Wednesday, October 10, 2012

Easy way to identify the Content Type ID and/or GUID of a content type

If you're looking for an easy way to identify the Content Type ID and/or GUID that is associated with a content type, here are a few quick steps that you can use:

  1. Navigate to the root site where your content types are stored
  2. Click on Site Actions -> Site Settings
  3. Under Galleries, click on Site content types
  4. Locate and click on the link associated with the content type you wish to obtain the GUID for
  5. Right-click on the URL in your browser and select Copy
  6. Open Notepad and paste the link so that you can review it
  7. The Content Type ID associated with your content type is located immediately in between the text that reads "ctype=" and the first ampersand, "&", character.  Here is a quick sample of what this will look like with the appropriate Content Type ID bolded:

    http://webapplicationname/sitename/_layouts/ManageContentType.aspx?ctype=0x01010035C1DFBDC85613499278F0D16DBD4C5D&Source=...
If you're interested in obtaining the GUID from a Content Type ID associated with a Document Library, you simply need to remove the "0x010100" prefix.  Further details on what makes up a Content Type ID can be found at the following location:

http://msdn.microsoft.com/en-us/library/aa543822.aspx

Tuesday, October 2, 2012

Strategies for implementing a 'Wait Notification' for a long running operation: AJAX

If you're looking for a way to inform the users of your ASP .NET web application that processing is actually taking place during a long running process and you happen to be using an AJAX UpdatePanel control, here is a strategy that you can use that will keep your users informed.  In order to make this work, you will need to make certain that the following three controls exist on your ASPX page (NOTE: two of these controls, the asp:ScriptManager and asp:UpdatePanel, will already be present on your page if you're already using an asp:UpdatePanel control on your web page):

<asp:ScriptManager ID="ScriptManager1" runat="server"></asp:ScriptManager>
<asp:UpdateProgress ID="updateProgress" AssociatedUpdatePanelID="updatePanel1" runat="server" DynamicLayout="true">
    <ProgressTemplate>
        <div align="center" id="div_ProcessingMessage" runat="server"><span>Processing...</span></div>
        </div>
    </ProgressTemplate>
</asp:UpdateProgress>
<asp:UpdatePanel ID="updatePanel1" runat="server">'
...

After these changes are in place, you can fire up your application and the message or image contained in the <div> tag will pop up in the specified location whenever a postback is triggered on the page.  The longer the process takes, the longer this message will stay visible to the users.  Once the postback operation is complete, the message will be hidden again.

Thursday, September 27, 2012

Strategies for implementing a 'Wait Notification' for a long running operation: standard ASP .NET

If you're looking for a good way to inform the users of your ASP .NET web application that processing is actually taking place during a long running process, here is a simple strategy you can use that involves standard ASP .NET.  Now, in order to make this work, you'll need to make three changes to the web page hosting the process which are listed as follows:
  1. Add a <div> tag to your HTML code that will be used for hosting the "Processing..." message or image.  Here is a simple example:

    <div align="center" id="div_ProcessingMessage" runat="server" style="display: none;"><span> Processing... </span></div>

  2. Add a javascript function that displays the above-mentioned <div> when called (NOTE: you could also add code to disable controls that you don't want the user touching in the event of a long running process).  Here is a simple example:

    <script type="text/javascript">
    function EnableProcessingMessage() {
        var test = document.getElementById('div_ProcessingMessage');
        test.style.display = "";
    }
    

  3. Add an "onsubmit" attribute to the <form> tag of your web page that calls the above-mentioned javascript function.  Here is a simple example:

    <form id="form1" runat="server" onsubmit="EnableProcessingMessage()">
After these changes are in place, you can fire up your application and the message or image contained in the <div> tag will pop up in the specified location whenever a postback is triggered on the page.  The longer the process takes, the longer this message will stay visible to the users.  Once the postback operation is complete, the message will be hidden again.

By the way, if you don't want the users clicking on various controls during a long running operation, you can prevent them from doing so by adding code to your javascript method that can temporarily hide or disable those controls.

Now, if you're using AJAX, this strategy won't work so I'll provide you with another solution for that in my next post...

Friday, September 21, 2012

Details on the SharePoint 2010 "Manage Web Site" permission

Our SharePoint Admin was recently trying to dig up some details on exactly what permissions/functionality the Manage Web Site permission provides when reviewing the permissions granted to a given permission level.  The permission itself reads "Grants the ability to perform all administration tasks for the Web site as well as manage content"; however, that doesn't provide the specific details that she was looking for.  Just to be clear on what I'm talking about, you can access the permissions of a given permission level via the following steps:

  1. Log on to the root site of a site collection that you're designated as a site collection administrator of
  2. Click on Site Actions -> Site Permissions
  3. On the ribbon, locate the Manage section and click on Permission Levels
  4. Click on one of the links associated with any permission level
  5. Review the Permissions enumeration located on the right side of the screen
  6. Scroll down to the Site Permissions category
  7. Scroll down to the fourth checkbox and you will see the Manage Web Site permission

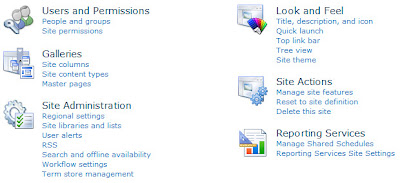
Unfortunately, I wasn't able to locate detailed information on what this permission provides so I decided to grind out an answer to her question by simply adding and removing the Manage Web Site permission and comparing the difference between the capabilities that were listed under Site Actions -> Site Settings for a test account that was explicitly granted the permission level I was modifying.  The results of this analysis are presented in the following screen shots:

Image#1 - Site Settings without Manage Web Site

Image#2 - Site Settings with Manage Web Site

Based on these results, the Manage Web Site permission provides the following capabilities:
  • Look and Feel
    • Tree view
      • Ability to adjust whether the Quick Launch is enabled/disabled
      • Ability to enable/disable a Tree View to aid navigation
  • Galleries
    • Master pages
      • Access to the Master Page Gallery
  • Site Administration
    • RSS
      • Ability to allow RSS feeds in the site
      • Specify site-wide channel elements for the RSS feeds if enabled
        • Copyright info
        • Managing Editor
        • Webmaster
        • Time To Live (minutes)
    • Search and offline availability
      • Ability to choose whether or not the site appears in search results
      • Specify the indexing behavior associated with site ASPX pages and content
      • Ability to choose whether or not content can be downloaded to offline clients
    • Workflow settings
      • Ability to manage workflows on the site
    • Term store management
      • Ability to specify the Managed Metadata Service of the site as well as control who can manage the associated term store
  • Site Actions
    • Manage site features
      • Ability to active/deactivate site features
    • Reset to site definition
      • Ability to restore the site back to its original site template
    • Delete this site
      • Ability to permanently delete the site
  • Reporting Services
    • Manage Shared Schedules
      • Ability to manage schedule information associated with reports or subscriptions associated with the site
    • Reporting Services Site Settings
      • Ability to modify the default site settings for Reporting Services
        • Enable client-side printing by allowing the RSClientPrint ActiveX control to be available for download from the site
        • Enable local mode error messages to allow error messages to be passed to remote computers when running in local mode
        • Enable accessibility metadata in the HTML output for reports

At this time, I haven't delved deeper into whether or not there are any differences within the functionality that is common between the two cases (i.e. both have the Quick Launch link active under Look and Feel); however, it's entirely possible there could be differences.  For now, this research has provided us with enough information to satisfy our needs; therefore, I'm going to stop here for the moment.  Hope this helps!

Thursday, September 20, 2012

One possible solution to the problem of the StaticSelectedStyle not working

If you run into a situation in which the StaticSelectedStyle property of your asp:Menu control simply isn't working, I have a solution that worked for me and might just work for you.  In my particular case, I have a Menu web control located on the Master Page of my web app and I'm using the following code to define my menu:

...
<asp:Menu ID="mnuMain" CssClass="NavigationMenu"  
    staticdisplaylevels="2" DynamicHorizontalOffset="1"
    staticsubmenuindent="1px" MaximumDynamicDisplayLevels="4"
    orientation="Horizontal" runat="server">
    <StaticHoverStyle CssClass="NavigationMenu_StaticHoverStyle" />
    <StaticMenuItemStyle CssClass="NavigationMenu_ItemStyle" />
    <StaticSelectedStyle CssClass="NavigationMenu_StaticSelectedStyle" />
    <Items>
        <asp:MenuItem NavigateUrl="~/Default.aspx" Text="Review My Groups" />
...

The root cause of my problem with the style of the selected item not being set properly was, ultimately, due to the fact that I wasn't updating the Selected property of the menu item that represents the current page being displayed.  To resolve the issue, I simply added the following code to the PageLoad event of my Master Page, the location where my Menu control resides, to set the Selected property of the menu:
protected void Page_Load(object sender, EventArgs e)
{
    string currentPage = Page.AppRelativeVirtualPath;
    foreach (MenuItem item in mnuMain.Items)
    {
        if (item.NavigateUrl == currentPage)
        {
            item.Selected = true;
        }
    }
}

This code basically tells the Menu which item has been selected and will enable the StaticSelectedStyle property to be applied to the selected menu item.

Friday, September 14, 2012

Programmatically obtain a list of Active Directory groups that an individual is a member of

Here is some sample code that will allow you to obtain a complete list of all of the Active Director groups that a specified user is a member of:

public void GetGroupsUserIsMemberOf(string sAMAccountName)
{
    try
    {
        using (DirectoryEntry dirEntry = new DirectoryEntry())
        {
            dirEntry.Path = "LDAP://OU=OUName,DC=DCName,DC=org";
            dirEntry.AuthenticationType = AuthenticationTypes.Secure;

            using (DirectorySearcher dirSearch = new DirectorySearcher(dirEntry))
            {
                dirSearch.Filter = string.Format("(&(objectCategory=person)(objectClass=user)(SAMAccountName={0}))", sAMAccountName);
                dirSearch.PropertiesToLoad.Add("memberOf");
                SearchResult result = dirSearch.FindOne();
                if (result != null)
                {
                    int propCount = result.Properties["memberOf"].Count;
                    for (int i = 0; i <= propCount - 1; i++)
                    {
                        // Clean up the name of the group for display purposes
                        char[] delim = new char[] { ',', '\\' };
                        string groupName = result.Properties["memberOf"][i].ToString().Split(delim).First().Replace("CN=", string.Empty);
                        Console.WriteLine(string.Format("Group# {0}: {1}", i+1, groupName);
                    }
                }
            }
        }
    }
}

Monday, September 10, 2012

Programmatically obtain user information from Active Directory

Here is a sample method that you can use for contacting Active Directory in order to obtain information about a user based on his/her username/account name (a.k.a. sAMAccountName in AD):

public void GetUserDistinguishedName(string sAMAccountName)
{
    using (DirectoryEntry dirEntry = new DirectoryEntry())
    {
        dirEntry.Path = "LDAP://OU=OUName,DC=DCName,DC=org";
        dirEntry.AuthenticationType = AuthenticationTypes.Secure;

        using (DirectorySearcher dirSearch = new DirectorySearcher(dirEntry))
        {
            dirSearch.Filter = string.Format("(&(objectCategory=person)(objectClass=user)(SAMAccountName={0}))", sAMAccountName);
            SearchResult result = dirSearch.FindOne();
            if (result != null)
            {
                Console.WriteLine(string.Format("Distinguished Name: {0}" ,result.Properties["distinguishedname"][0].ToString()));
                Console.WriteLine(string.Format("First Name: {0}", result.Properties["givenname"][0].ToString()));
                Console.WriteLine(string.Format("Last Name: {0}", result.Properties["sn"][0].ToString()));
                Console.WriteLine(string.Format("Email Address: {0}", result.Properties["mail"][0].ToString()));
            }
        }
    }
}

Thursday, August 30, 2012

Adding the contents of an entire folder into a Visual Studio 2010 project

If you'd like to bulk add the contents of an entire folder into the structure of a Visual Studio 2010 project (i.e. JQuery libraries are a perfect example), you'll soon discover that the Add -> Existing Item... route is not the way you want to go.  A quick solution for bulk adding a folder is to do the following actions:

  1. Open Windows Explorer and navigate to the folder you wish to copy
  2. Right-click on the folder and select Copy
  3. Open the applicable Visual Studio 2010 solution
  4. Select the project you wish to copy the folder to
  5. Navigate to the proper location in the project and right-click on the parent location of the folder
  6. Select Paste
The folder and all of it's sub-folders and files will now be copied into the specified location.  I know this seems like it would be obvious, but I seem to experience a moment of "how did I do that last time?" whenever it's been a while since I've created a solution that requires me to do this.  Good stuff!

Friday, August 24, 2012

Open a SharePoint 2010 List Item dialog via a hyperlink

One of our users was looking for a way to consolidate several links that, when clicked, would open the standard dialog to create a new list item for the associated List located on her SharePoint 2010 site in the same way that the "Add new item" link functions.

The solution we ended up using was introduced by one of my Avanade compatriots in the UK, Phil Childs, and his write up can be found at the following URL: Open list item modal dialog (lightbox) with a hyperlink in SharePoint 2010

The code that highlights one of the many links we added to our Content Editor web part to make this solution work is presented as follows:

<script type="text/javascript">
var optionsCABRequest = {
url: "http://SiteUrl/_layouts/listform.aspx?PageType=8&ListId={GuidOfOurSharePointList}&RootFolder=",
    title: "Create a new CAB Request",
    allowMaximize: true,
    showClose: true,
    width: 735,
    height: 580,
    dialogReturnValueCallback: silentCallback};
function openNewCABRequestForm() {SP.UI.ModalDialog.showModalDialog(optionsCABRequest);}
function silentCallback(dialogResult, returnValue) {
}
function refreshCallback(dialogResult, returnValue) {
  SP.UI.Notify.addNotification('Operation Successful!');
  SP.UI.ModalDialog.RefreshPage(SP.UI.DialogResult.OK);
}
</script>
<br/>
<div>Click <a href="javascript:openNewCABRequestForm()">here</a> to create a new CAB Request</div>

Our thanks definitely goes to Phil for creating and sharing this solution. It worked perfectly for what our user was trying to accomplish.  Thanks, Phil!

Wednesday, August 22, 2012

Need to remove a problem web part?

If you've ever run into a situation in which a web part isn't working properly and is causing your web page to error out in such a way that it prevents you from being able to access/edit the page so that you can remove the offending web part (the InfoPath web part is notorious for this problem), here is a quick solution:
  1. Navigate to the web page on which the offending web part is installed
  2. Append the following text to the end of your URL in your browser's address window: "?contents=1"
  3. Hit Enter to refresh the browser
You will now be presented with the Web Part Page Maintenance view which will allow you to review a list of installed web parts and, potentially, close or remove the offending web part.  Here are the quick steps you can use to remove the web part:
  1. Review the list of web parts and place a check in the check box next to the offending web part
  2. Click the Delete link

Your web part will now be removed from the page so that you can attempt to perform a fresh install of the web part or, at the very least, allow your users to access the given page while you are given some time to figure out what went wrong with it.

Tuesday, August 14, 2012

How to create and run your first SharePoint Powershell script

As of late, I've been playing with Powershell quite a bit and thought I'd begin sharing some of the code samples that I've created and shared with our SharePoint Admin team.  For starters, I'd like to begin the journey by teaching those of you unfamiliar with Powershell how to create a simple script as well as execute it.  In this example, I'm going to create a script that performs several common actions that you're likely to run into when scripting in Powershell which are listed as follows:

  • Attach the Microsoft SharePoint assembly so that you can reference commonly used APIs
  • Accept input from the user
  • Write information to the console
  • Pause the window so that it doesn't close immediately after the script is run

When executed this script will do the following:

  • Prompt the user for the link to a site collection he/she would like to view a list of all sites contained under (i.e. http://SharePointWebApplication)
  • Write out the list of sites contained under the site collection to the console
  • Prompt the user to press any key to close the console

Creating a Powershell script:
  1. Open Notepad
  2. Copy and paste the following code into it:

  3. [System.Reflection.Assembly]::Load("Microsoft.SharePoint, Version=14.0.0.0, Culture=neutral, PublicKeyToken=71e9bce111e9429c")
    $siteCollectionURL = Read-Host "Enter the URL of the Site Collection"
    $site = new-object Microsoft.SharePoint.SPSite($siteCollectionURL)
    
    foreach ($webs in $site.AllWebs)
    {
     Write-Host "URL:", $webs.Url
    }
    $site.Dispose()
    
    $Input = Read-Host "Please press any key to close the window"
    

  4. Click File -> Save As...
  5. Navigate to the directory you'd like to save your script under
  6. For File name:, enter a name for your file and add .PS1 to the end of it (i.e. ListAllSiteUnderSiteCollection.PS1)
  7. For Save as type:, select All Files
  8. Click Save

Executing the script:
  1. Right-click Start -> Open Windows Explorer
  2. Navigate to the directory where you just save your script
  3. Right-click on the script file and select Run with Powershell

Modifying the script:
  1. Right-click Start -> Open Windows Explorer
  2. Navigate to the directory where you just save your script
  3. Right-click on the script file and select Open With -> Notepad

I'll be certain to provide more scripts in the future, but at least wanted to start with the basics so that you'll know what do when you see them show up on my blog from time to time.

Thursday, August 2, 2012

Sample code for SharePoint ULS logging

The following code is a sample of how to write information to the ULS Log from your SharePoint-related code (in this case, I'd like to send an informational message from the code in my web part):

SPDiagnosticsService.Local.WriteTrace(0, new SPDiagnosticsCategory("My Web Part", TraceSeverity.Verbose, EventSeverity.Information), TraceSeverity.Verbose, "Message I'd like to log", null);

In the event you don't see the message showing up in the ULS Log, it could be possible that your SharePoint Admin is filtering out items with a low level TraceSeverity or EventSeverity such as those I'm using here (i.e. TraceSeverity.Verbose and EventSeverity.Information).  By the way, I'll be certain to cover how this is controlled in my next post.

Now, if you're interested in communicating error messages, there is a different method that you can use to write to both the Event Log and the ULS Log. The following code covers a simple way that you can communicate an error to both of those logs:

try
{
     ...
}
catch (Exception ex)
{
     SPDiagnosticsService.Local.WriteEvent(0, new SPDiagnosticsCategory("My Web Part ", TraceSeverity.Unexpected, EventSeverity.Error), EventSeverity.Error, ex.Message, ex.StackTrace);
}

Monday, July 30, 2012

Determining the location of your SharePoint 2010 log files

If you're researching a problem with your SharePoint 2010 farm and wish to peruse the SharePoint log files, the standard location for these files is listed as follows:

 C:\Program Files\Common Files\Microsoft Shared\Web Server Extensions\14\LOGS

If the directory doesn't contain any files, this most likely indicates that your SharePoint Admin has configured the logs to be sent to another location in order to conserve hard drive space on the C: drive.  If the files have been moved, you can locate them via the following steps:
  1. Open SharePoint 2010 Central Administration
  2. Click on Monitoring
  3. Under Reporting, click on Configure diagnostic logging
  4. Scroll down to the Trace Log extension and locate the Path text box
The information contained in the Path text box is the location where your SharePoint log files are being written.

Thursday, July 19, 2012

Programatically set the initial selected node in an ASP.NET TreeView control

I just ran into a scenario in which I wanted to have the first node in a TreeView control selected the first time the user accesses the given page (i.e. the node is set when the page was initially loaded).  In order to make this work properly, I had to add two lines of code to my PageLoad event that performed the following actions:
  1. Set the selected node of the TreeView control
  2. Trigger the Treeview.SelectedNodeChanged event to simulate the user clicking on the given node
Here is a summarized sample of the code that I added to my PageLoad event that allowed me to simulate a user clicking on the first node when the page was initially loaded:

protected void Page_Load(object sender, EventArgs e)
{
    if (!IsPostBack)
    {
        // Code that initializes the TreeView
        ...

        treeViewControl.Nodes[0].Select();
        treeViewControl_SelectedNodeChanged(this, EventArgs.Empty);
    }
}
If you'd like to select a certain node, my thought is that you could use the TreeView.FindNode method to locate a particular node in the list. In that case, your code would appear as follows:

protected void Page_Load(object sender, EventArgs e)
{
    if (!IsPostBack)
    {
        // Code that initializes the TreeView
        ...

        treeViewControl.FindNode(PathOfNode).Select();
        treeViewControl_SelectedNodeChanged(this, EventArgs.Empty);
    }
}
Naturally, you will need to write some additional code to look up the path to your given node, but my hope is that this will give you some idea as to how this might be accomplished.

Tuesday, July 17, 2012

Programatically modify a SharePoint List Item

The following code sample code provides a means for being able to perform actions on a list item in one of your SharePoint List or Document Library.  In this particular instance, I'm reviewing a specific item in a Document Library and performing an action that is dependent on the Check Out status of the associated file:

using Microsoft.SharePoint;

...

Guid siteId = new Guid(...);
Guid webId = new Guid(...);
Guid listId = new Guid(...);
Guid listItemId = new Guid(...);

using (SPSite site = new SPSite(siteId))
{
    using (SPWeb web = site.OpenWeb(webId))
    {
        SPList list = web.Lists[listId];
        SPListItem listItem = list.Items[listItemId];

        web.AllowUnsafeUpdates = true;
        if (listItem.File.CheckOutType.Equals(SPFile.SPCheckOutType.None))
        {
            // Perform the action associated with the file being checked in...
        }
        else
        {
            // Perform the action associated with the file being checked out...
        }
        listItem.Update();
        web.AllowUnsafeUpdates = false;
    }
}

Tuesday, July 10, 2012

Adding an email link to a field contained in a GridView control

The following code sample provides a simple way to add a hyperlink to your GridView control that will launch the user's email client when the user clicks on the link.  In this case, you'll want to focus on the second BoundField control which creates the mailto hyperlink:

<asp:GridView ID="gridViewSiteAdmins" AutoGenerateColumns="false" runat="server"
    EnableModelValidation="True" >
    <Columns>
        <asp:BoundField HeaderText="Name" DataField="Name" />
        <asp:BoundField HeaderText="Email" DataField="Email" DataFormatString="<a href=mailto:{0}>{0}</a>" HtmlEncodeFormatString="false" />
    </Columns>
</asp:GridView>

By the way, there are other routes you can use to do this, but I thought I'd at least give you one that works well for me.

Wednesday, June 27, 2012

Create a Visual Web Part that displays the entire SharePoint site structure of a SharePoint web application

In the following code sample, I've created a Visual Web Part that will display the entire site structure contained under the parent SharePoint Web Application.  This web part will display all sites despite the fact that the given user may not have access to all of the sites beneath the structure.  Naturally, unauthorized users won't be able to access the site when he/she clicks on the link, but they will at least be aware of its existence and can contact the SharePoint Admin in order to request access.  For this web part, I've chosen to use a Tree View control for displaying the structure, but feel free to get creative if you like.  By the way, I've also added a method, SetCurrentNodeFont, here that can be used for highlighting the SharePoint site under which the web part is installed.  Last but not least, I've removed my error handling code in order to simplify things a bit so be sure to include or suffer the consequences...  


Here is the code:

ASCX File

<asp:TreeView ID="treeViewSiteNav" runat="server">
</asp:TreeView>


ASCX.CS File

using System;
using System.Web.UI;
using System.Web.UI.WebControls;
using System.Web.UI.WebControls.WebParts;
using Microsoft.SharePoint;
using Microsoft.SharePoint.WebControls;
using Microsoft.SharePoint.Administration;

protected void Page_Load(object sender, EventArgs e)
{
    treeViewSiteNav.Nodes.Clear();
    SPSecurity.RunWithElevatedPrivileges(delegate()
    {
        // Display the entire navigation structure of the web application
        SPSiteCollection sites = SPContext.Current.Site.WebApplication.Sites;
        foreach (SPSite currentSite in sites)
        {
            MapCurrentSiteCollection(currentSite.ID, currentSite.RootWeb.ID);
            currentSite.Dispose();
        }
    });
}


private void MapCurrentSiteCollection(Guid siteId, Guid webId)
{
    // Creating a new instance of the site because the currentSite is associated with the context of the
    // user whereas this new instance will run with elevated privileges
    using (SPSite site = new SPSite(siteId))
    {
        site.CatchAccessDeniedException = false;
        using (SPWeb currentWeb = site.OpenWeb(webId))
        {
            TreeNode siteNode = new TreeNode(currentWeb.Title, null, null, currentWeb.Url, "_self");
            SetCurrentNodeFont(ref siteNode, SPContext.Current.Web.ID, currentWeb.ID);
            treeViewSiteNav.Nodes.Add(siteNode);
            foreach (SPWeb web in currentWeb.Webs)
            {
                AddWebNodes(web, siteNode);
                web.Dispose();
            }
        }
    }
}

private void SetCurrentNodeFont(ref TreeNode node, Guid currentWebId, Guid evaluatedWebId)
{
    if (currentWebId == evaluatedWebId)
    {
        node.Text = Server.HtmlDecode(string.Format("<b>{0}</b>", node.Text));
    }
}

Friday, June 22, 2012

Remove special characters from a string using Regular Expression

If you're looking for an efficient way to remove special characters from a string, here is some sample code that utilizes a Regular Expression to do so:

using System.Text.RegularExpressions;
...
string inputString = "Sherman's Test #123";
string cleanOutputString = Regex.Replace(inputString,  @"[^A-Za-z0-9-_]", "");

This code sample will remove all characters except for alpha-numeric characters and "_".  If you would like to keep the empty characters/blank spaces, use this line instead:
string cleanOutputString = Regex.Replace(inputString,  @"[^A-Za-z0-9-_ ]", "");

Wednesday, June 20, 2012

Automatically activate a web or site scoped feature during site creation

I know of two good techniques for automatically activating a web or site scoped feature when a new SharePoint site is created and they are (1) if you're using a custom site definition, to insert a new <Feature> node within either the <SiteFeatures> or <WebFeatures> node of the ONET.xml file and (2) utilize a technique called Feature Stapling to attach your feature to a given site definition.

In both instances, you will need to know the ID, Title, and Scope of you feature.  These can be found by opening your feature's Feature.xml file and locating the appropriate attributes of the <Feature> node.  Here is a simplified example of what you might find in a sample Feature.xml file:

<?xml version="1.0" encoding="utf-8"?>
<Feature xmlns="..." Title="My Feature" Description="..." Id="b68c860b-b368-4e5f-ae06-dcfbfbd9c8da" ReceiverAssembly="..." Scope="Web"></Feature>


ONET.XML Update
This technique should only be used if your site is based on a custom site definition that you or your team created (i.e. that's the case if you have a custom ONET.xml file in your solution).  NOTE: You change will likely be overwritten with a service pack installation. With that said, the basic premise of this technique is to insert a new <Feature> node within either the <SiteFeatures> or <WebFeatures> node of the ONET.xml file which can be accomplished as follows:

  1. Open your ONET.xml file using Visual Studio or Notepad
  2. Locate the <SiteFeatures> or <WebFeatures> node depending on the scope of the feature
  3. Create a new <Feature> node and add the appropriate ID and Name attributes
  4. Save the changes
In this example, I will use the details from my sample feature:

<Project>
   <Configurations>
      <Configuration>
         <SiteFeatures />
         <WebFeatures>
            <Feature ID="b68c860b-b368-4e5f-ae06-dcfbfbd9c8da" Name="My Feature" />
         </WebFeatures>
      </Configuration>
   </Configurations>
</Project>

Feature Stapling
This technique is the only approach that I know of for automatically activating a feature on a standard SharePoint site template.  In this case, you will be creating a new Farm level feature that, when activated, will "staple" your feature to all sites that reference the specified template.  Here is an example of the "stapling" feature code that will be contained in a new Feature.xml file:

<?xml version="1.0" encoding="utf-8" ?>
<Feature Id="7ac7f1e9-1c6a-4ff0-a2bc-0d81e2360b70"
    Title="Feature Staple Sample"
    Description="Staple the associated feature(s) to the specified site definition(s)"
    Version="1.0.0.0"
    Hidden="FALSE"
    Scope="Farm"
    xmlns="http://schemas.microsoft.com/sharepoint/">
   <ElementManifests>
      <ElementManifest Location="staple.xml" />
   </ElementManifests>
</Feature>

and here is some sample code that will be contained in the references staple.xml file that will automatically launch the specified feature on the standard SharePoint Team Site template:

<Elements xmlns="http://schemas.microsoft.com/sharepoint/">
   <FeatureSiteTemplateAssociation Id="b68c860b-b368-4e5f-ae06-dcfbfbd9c8da" TemplateName="STS#0" />
</Elements>

Monday, June 18, 2012

Javascript code that can verify if special characters are used in a textbox

In the event that you would like to use client-side code to (1) inform a user that he/she has entered invalid characters in a textbox control, (2) highlight that control, and (3) place the focus on it, the following Javascript code can be added to a validation function to carry out all of three of those actions:

function ValidateRequest() { ... if (form.userinput_textbox.value != 0)
{ var userInputField = form.userinput_textbox.value; var invalidChars = "/!@#$%^&*(){}[]<>\\"; for (var i = 0; i < userInputField.length; i++) { if (invalidChars.indexOf(userInputField.charAt(i)) != -1) { window.scrollTo(0, 0); alert ("Please don't use any special characters or punctuation within the given textbox control."); form.userinput_textbox.backgroundColor = "C6ECFF"; form.userinput_textbox.focus(); return false; } } } ... }

Friday, June 15, 2012

Feature that can be used to control the list of available web templates

If you would like to control the list of possible web templates that are available on a SharePoint site to users who are authorized to add sites, I'd like to present some code that you can add to a feature that will allow you to adjust the list of possible options.  In case you aren't certain what I mean by these available web templates, you can view this list by navigating to your SharePoint site and clicking on Site Actions -> New Site and you will be presented with a list of possible templates to choose from.

In the code sample below, activating the feature will remove all possible web templates with the exception of the standard Document Workspace template from the display list.  Deactivating the feature will allow the list of options to return to its normal mode of displaying all web templates:

public override void FeatureActivated(SPFeatureReceiverProperties properties) { try { SPWeb web = properties.Feature.Parent as SPWeb; // Hide all available web templates with the exception of the Document Center web template SPWebTemplateCollection currentTemplates = web.GetAvailableWebTemplates(1033); Collection newTemplates = new Collection(); foreach (SPWebTemplate currentTemplate in currentTemplates) { if (currentTemplate.Title.Trim() == "Document Workspace") { newTemplates.Add(currentTemplate); } } web.SetAvailableWebTemplates(newTemplates, 1033); web.Update(); } catch (Exception ex) { System.Diagnostics.Debug.WriteLine(ex.ToString()); } } public override void FeatureDeactivating(SPFeatureReceiverProperties properties) { try { SPWeb web = properties.Feature.Parent as SPWeb; // Show all available web templates web.AllowAllWebTemplates(); web.Update(); } catch (Exception ex) { System.Diagnostics.Debug.WriteLine(ex.ToString()); } }

Thursday, June 14, 2012

Restart a computer via Remote Desktop

If you're connected to a computer running Windows 7 or Windows Server 2008 via Remote Desktop and would like to restart it, here are two methods that you can use to do so:

  1. Click on the Remote Desktop session and hit Alt+F4
  2. Click on the Remote Desktop, open a DOS command prompt, type "shutdown -r", and hit Enter

Wednesday, June 13, 2012

Programmatically obtain a list of all properties associated with a user's profile in Active Directory

The following simplified code sample can be used for obtaining a list of all possible properties that are associated with a user's profile in Active Directory.  This code would be useful if you're trying to figure out which AD properties you may need to access to get the information you require:


using System.DirectoryServices;

...

try
{
   using (DirectoryEntry dirEntry = new DirectoryEntry("LDAP://yourOUPath))
   {
      using (DirectorySearcher dirSearch = new DirectorySearcher(dirEntry))
      {
         dirSearch.Filter = "(&(objectClass=user)(sAMaccountname=yourADLoginName))";
         SearchResult result = dirSearch.FindOne();
         if (result != null)
         {
            foreach (string propertyName in result.Properties.PropertyNames)
            {
               Console.WriteLine(propertyName);
            }
         }
      }
   }
}
catch (Exception ex)
{
   Console.WriteLine(ex.Message);
}


Likely culprits for issues with this code could be attributed to the following items:
  1. There could be issues with the structure of the LDAP path
  2. You may need to specify a DirectoryEntry.Username and DirectoryEntry.Password
  3. You may need to define a DirectoryEntry.AuthenticationType


Thursday, May 31, 2012

SharePoint users are being prompted to save a PDF file

If your users are being prompted to save a PDF file as opposed to the document opening directly in the web browser, a solution for this issue is to add that file type (i.e. application/PDF) to the collection of allowed MIME content-types supported by your SharePoint web application.  Here are two different avenues that you can take to solve the problem:

Solution# 1: Use a Feature
Here is some C# code that you can place in a feature (i.e. the SPFeatureReceiver class) that will add the appropriate file type:

public override void FeatureActivated(SPFeatureReceiverProperties properties)
{
...
// To allow PDF files to be opened in the browser, make certain that the PDF file type is included
// in the list of allowed inline downloaded mime types.  Without this item, the browser will always
// prompt the user to Save the document as opposed to opening the file when the user clicks on the
// PDF document's link.
    if (!web.Site.WebApplication.AllowedInlineDownloadedMimeTypes.Contains(@"application/pdf"))
    {
         web.Site.WebApplication.AllowedInlineDownloadedMimeTypes.Add(@"application/pdf");
         web.Site.WebApplication.Update();
     }
...
}

Solution #2: Use Powershell
Here is a series of Powershell commands that will add the appropriate file type as well:

PS C:\Users\...> $webApp = Get-SPWebApplication http://webapplicationname
PS C:\Users...> $webapp.AllowedInlineDownloadedMimeTypes.Add("application/pdf")
PS C:\Users\...> $webapp.Update()

Wednesday, May 30, 2012

Where can I find the default SharePoint Master Page?

In case you're looking for the default master page that SharePoint uses for it's standard sites, you can obtain a copy of it via the following steps:
  1. Log on to your web front end server
  2. Open Windows Explorer
  3. Navigate to the following directory:  C:\Program Files\Common Files\Microsoft Shared\Web Server Extensions\14\TEMPLATE\GLOBAL
The default master page used by SharePoint is the v4.master file.

Friday, May 25, 2012

PDF icon not displayed on your SharePoint site

If you've recently set up your SharePoint farm and noticed that a generic icon is being displayed for the PDF files in your document libraries, here are a few steps that you can use to add that icon to your farm:

  1.  Open IE and access the following link to obtain an official copy of the small, 16x16 Adobe logo, pdficon_small.png:  http://www.adobe.com/misc/linking.html
  2.  Log on to your SharePoint web front end server
  3.  Open Windows Explorer and navigate to the C:\Program Files\Common Files\Microsoft Shared\Web Server Extensions\14\TEMPLATE\IMAGES directory
  4.  Copy the pdficon_small.png file to this location
  5.  Navigate to the C:\Program Files\Common Files\Microsoft Shared\Web Server Extensions\14\TEMPLATE\XML directory and locate the DOCICON.xml file
  6.  Open the DOCICON.xml file with Notepad
  7.  In the <ByExtension> node, add the following line: <Mapping Key="pdf" Value="pdficon_small.png" />
  8.  You'll need to reset IIS for the changes to take effect:
    1. Open a command prompt
    2. Type "iisreset"
    3. Hit Enter

NOTE:  For SharePoint 2007, you'll need to make the following minor modifications to the steps above:
  • For Step# 3, use C:\Program Files\Common Files\Microsoft Shared\Web Server Extensions\12\TEMPLATE\IMAGES instead
  • For Step# 5, use C:\Program Files\Common Files\Microsoft Shared\Web Server Extensions\12\TEMPLATE\XML instead

Wednesday, May 23, 2012

Obtain a list of checked-out files for a given user in TFS

Here are a few quick steps that you can use for obtaining a list of all files that are currently checked-out for a given user in Team Foundation Server 2010:
  1. On your workstation where Visual Studio 2010 is installed, open a command prompt
  2. Type "cd c:\Program Files (x86)\Microsoft Visual Studio 10.0\Common7\IDE" and hit Enter
  3. Type "tf status /recursive /user:username" and hit Enter
If you'd like to print the output to a text file, you can adjust Step# 3 as follows:

"tf status /recursive /user:username > C:\usernamescheckedoutfiles.txt"

Monday, May 21, 2012

Accessing files contained in the Global Assembly Cache

If you plan on writing any custom code against a SharePoint site, the first thing you're going to need to get your hands on are the SharePoint assembly files that are installed in the GAC (Global Assembly Cache).  Here are the steps to obtain such files:

  1. Log on to the SharePoint web front end server
  2. Open a DOS command prompt (Click Start -> Run, type "cmd", and hit Enter)
  3. Type "subst G: %windir%\assembly"
  4. Open Windows Explorer and navigate to the newly created G: drive
  5. At this point, you have direct access to the .dll files stored in the GAC and you simply have to drill down the folder structures to find what you're looking for
P.S.  If you're looking for Microsoft.SharePoint.dll, it's located under the GAC_MSIL directory...

Sunday, May 20, 2012

Remote Debugging SharePoint Code

If you need to remotely debug the C# code associated with SharePoint web parts, event receivers, etc., here are the steps you can use to make that happen:

Activate the Visual Studio Remote Debugging Monitor


The following steps are used for initiating the Visual Studio remote debugging monitor on your SharePoint web front end server so that a connection may be established between it and your instance of Visual Studio (which will, of course, be located on your workstation):

  1. Log on to your web front end server
  2. Open Windows Explorer and navigate to the following directory: C:\Program Files\Microsoft Visual Studio 10.0\Common7\IDE\Remote Debugger
  3. If the directory doesn't exist on the server, you can obtain a copy of it from the laptop or desktop upon which Visual Studio 2010 is installed
  4. Once you're in the Remote Debugger directory, double click on the appropriate directory name based on the processor of your web front end server (i.e. x64 is most likely what you'll choose if you're working with SharePoint 2010)
  5. Double click on the msvsmon file
  6. Copy the name of the new server that is started as you'll be using it later when you're ready to attach Visual Studio to your process.  This will be the string that is contained in the Description field as follows:  Msvsmon started a new server name 'CopyThisName'. Waiting...


Deploy Your Assembly and Debug Files to the BIN Directory


If you're solution is currently deployed to the Global Assembly Cache (GAC), you're going to need to temporarily change gears and deploy to your web application's BIN directory due to the fact that the Global Assembly Cache doesn't support .pdb files.  Here the steps you can perform to temporarily change your deployment to the BIN directory:
  1. On your SharePoint web front end server, open Windows Explorer and navigate to your SharePoint web application's directory (C:\inetpub\wwwroot\wss\virtual directories\webapplicationname)
  2. Locate the bin directory and copy all of your SharePoint site's assembly and debug (.dll and .pdb) files into it
  3. Save off a backup copy of your web.config file
  4. Using Notepad, open the web application's web.config file
  5. Locate the <trust> element
  6. Temporarily set the level attribute to read "Full" (i.e. <trust level="Full" originUrl="" />).  
NOTE: Steps# 4 - 6 will allow all files located in the bin directory to be fully trusted as if they were installed in the GAC

Next, you will need to remove your SharePoint site's .dll files from the GAC via the following steps:
  1. Using Windows Explorer, navigate to C:\Windows\Assembly
  2. Locate the first .dll file associated with your SharePoint site
  3. Right-click on the file and select Uninstall
  4. Repeat steps# 2 and 3 for each assembly until all of your SharePoint site .dll files have been removed
  5. In order for the change to take effect, you will need to reset IIS by opening a command prompt and typing "iisreset"


Obtain the Worker Process ID 


The following steps of the process will allow you to (1) verify that your deployment to the bin directory was successful and (2) to launch the worker process that you will be attaching to:
  1. On your workstation, open your web browser and navigate to your SharePoint site
  2. Verify that your site is functioning as expected (this also has the added bonus waking up the SharePoint worker process)
  3. On your SharePoint web front end server, open a command prompt
  4. Type "cd c:\windows\system32\inetsrv"
  5. Type "appcmd list wp"
  6. Identify the appropriate worker process that is associated with the application pool of your SharePoint site
  7. Take note of the ID that is associated with that worker process which will be the numeric value in quotes (i.e.WP "724" (applicationPool:SharePoint - MySharePointSite80))


Attach Visual Studio to the Worker Process


These final step of the process will now allow you to connect your instance of Visual Studio with the remote debugging monitor so that you will, at last, be able to step through the C# code of your SharePoint components:
  1. On your workstation, open Visual Studio
  2. Open your SharePoint site's code solution file
  3. Once your solution is loaded, open the appropriate .cs file you wish to debug and place your breakpoint(s)
  4. Click Debug -> Attach to Process...
  5. For Qualifier, update the textbox with the remote debugging server name that you captured in Step# 6 of the Activate the Visual Studio Remote Debugging Monitor section
  6. Select the w3wp.exe process that matches the ID that you recorded in Step# 7 of the Obtain the Worker Process ID section
  7. Click the Attach button


At this point, you will now be able to debug your SharePoint site's C# code as you would any other type of solution.  Wish you the best with your debug efforts and may you squash that bug quickly!

Wednesday, May 9, 2012

Save SQL Server Management Studio Output in a Pipe-Delimited File

In the event that you would like to obtain a pipe-delimited (i.e. '|') output file of data obtained from a query executed in SQL Server Management Studio, here is a quick procedure for making that happen:

If you're using Windows Server 2008 R2:

  1. Click Start -> Control Panel
  2. Click Clock, Language, and Region
  3. Click Change the date, time, or number format
  4. Click the Additional settings... button
  5. In the List separator field, replace ',' with '|'
  6. Click Apply
  7. Click OK
  8. Click OK
  9. Open SQL Management Studio and execute your query
  10. Write click in the Results window and select Save Results As...
  11. Select the appropriate directory path
  12. For File name:, enter an appropriate filename
  13. For Save as type:, select CSV (Comma delimited)
  14. Click Save
  15. You may now open the file in Notepad and confirm that the output is indeed pipe-delimited as opposed to comma-delimited
Once you have the pipe-delimited output you desire, the procedure to reset back to comma delimited is as follows:

  1. Click Start -> Control Panel
  2. Click Clock, Language, and Region
  3. Click Change the date, time, or number format
  4. Click the Additional settings... button
  5. In the List separator field, replace '|' with ','
  6. Click Apply
  7. Click OK
  8. Click OK
The procedures will be slightly different for other MS operating systems, but the concept will be the same.

Tuesday, April 17, 2012

Obtaining a List of Users from a SharePoint site via a SQL command

It's only a matter of time before your PM is going to come to you one day and ask you "so...who now has access to that site you set up about a year ago?".  Rather than having to root around the various groups and compiling the list by hand, the quick n' dirty solution to this problem is to run the following SQL command against your SharePoint content database.  This query will quickly obtain a list of users based on the SharePoint groups they belong which you can then slap it into an Excel spreadsheet for them:
SELECT DISTINCT [Groups].[Title] as 'Group', [UserInfo].[tp_Title] as 'User', [UserInfo].[tp_Email] as 'Email' FROM [Groups] INNER JOIN [GroupMembership] ON [GroupMembership].GroupId = [Groups].ID AND [GroupMembership].SiteID = [Groups].SiteID INNER JOIN [UserInfo] ON [UserInfo].tp_ID = [GroupMembership].MemberId AND [UserInfo].tp_SiteID = [GroupMembership].SiteID ORDER BY [Groups].[Title] ASC, [UserInfo].[tp_Title] ASC
By the way, please don't get the impression that I'm implying that you can write INSERT or DELETE statements against these databases.  The minute you do that is the minute that Microsoft will "disown" your SharePoint site and will not be able to provide technical support for it.  This information should be considered READ-ONLY to you and you should only add, modify, or delete users using the SharePoint interface.

Friday, April 13, 2012

Programmatically initiate javascript from code behind

Occassionally, situations may arise in which you want to initiate javascript from the C# code behind of your web application.  In the following simple example, the code in the Page Load event is triggering a simple alert message to fire; however, the sky is the limit with all the possibilities that this opens up:

protected void Page_Load(object sender, EventArgs e)
{
    if (!IsPostBack)
    {
        if (!ClientScript.IsStartupScriptRegistered(this.GetType(),"alert"))
        {
            Page.ClientScript.RegisterStartupScript(this.GetType(), "alert", "alert('All leases must be re-assigned to another parent before the delete operation may continue.  You may use this view to re-assign those leases.');", true);
        }
    }
}

Enjoy!