Thursday, May 31, 2012

SharePoint users are being prompted to save a PDF file

If your users are being prompted to save a PDF file as opposed to the document opening directly in the web browser, a solution for this issue is to add that file type (i.e. application/PDF) to the collection of allowed MIME content-types supported by your SharePoint web application.  Here are two different avenues that you can take to solve the problem:

Solution# 1: Use a Feature
Here is some C# code that you can place in a feature (i.e. the SPFeatureReceiver class) that will add the appropriate file type:

public override void FeatureActivated(SPFeatureReceiverProperties properties)
{
...
// To allow PDF files to be opened in the browser, make certain that the PDF file type is included
// in the list of allowed inline downloaded mime types.  Without this item, the browser will always
// prompt the user to Save the document as opposed to opening the file when the user clicks on the
// PDF document's link.
    if (!web.Site.WebApplication.AllowedInlineDownloadedMimeTypes.Contains(@"application/pdf"))
    {
         web.Site.WebApplication.AllowedInlineDownloadedMimeTypes.Add(@"application/pdf");
         web.Site.WebApplication.Update();
     }
...
}

Solution #2: Use Powershell
Here is a series of Powershell commands that will add the appropriate file type as well:

PS C:\Users\...> $webApp = Get-SPWebApplication http://webapplicationname
PS C:\Users...> $webapp.AllowedInlineDownloadedMimeTypes.Add("application/pdf")
PS C:\Users\...> $webapp.Update()

Wednesday, May 30, 2012

Where can I find the default SharePoint Master Page?

In case you're looking for the default master page that SharePoint uses for it's standard sites, you can obtain a copy of it via the following steps:
  1. Log on to your web front end server
  2. Open Windows Explorer
  3. Navigate to the following directory:  C:\Program Files\Common Files\Microsoft Shared\Web Server Extensions\14\TEMPLATE\GLOBAL
The default master page used by SharePoint is the v4.master file.

Friday, May 25, 2012

PDF icon not displayed on your SharePoint site

If you've recently set up your SharePoint farm and noticed that a generic icon is being displayed for the PDF files in your document libraries, here are a few steps that you can use to add that icon to your farm:

  1.  Open IE and access the following link to obtain an official copy of the small, 16x16 Adobe logo, pdficon_small.png:  http://www.adobe.com/misc/linking.html
  2.  Log on to your SharePoint web front end server
  3.  Open Windows Explorer and navigate to the C:\Program Files\Common Files\Microsoft Shared\Web Server Extensions\14\TEMPLATE\IMAGES directory
  4.  Copy the pdficon_small.png file to this location
  5.  Navigate to the C:\Program Files\Common Files\Microsoft Shared\Web Server Extensions\14\TEMPLATE\XML directory and locate the DOCICON.xml file
  6.  Open the DOCICON.xml file with Notepad
  7.  In the <ByExtension> node, add the following line: <Mapping Key="pdf" Value="pdficon_small.png" />
  8.  You'll need to reset IIS for the changes to take effect:
    1. Open a command prompt
    2. Type "iisreset"
    3. Hit Enter

NOTE:  For SharePoint 2007, you'll need to make the following minor modifications to the steps above:
  • For Step# 3, use C:\Program Files\Common Files\Microsoft Shared\Web Server Extensions\12\TEMPLATE\IMAGES instead
  • For Step# 5, use C:\Program Files\Common Files\Microsoft Shared\Web Server Extensions\12\TEMPLATE\XML instead

Wednesday, May 23, 2012

Obtain a list of checked-out files for a given user in TFS

Here are a few quick steps that you can use for obtaining a list of all files that are currently checked-out for a given user in Team Foundation Server 2010:
  1. On your workstation where Visual Studio 2010 is installed, open a command prompt
  2. Type "cd c:\Program Files (x86)\Microsoft Visual Studio 10.0\Common7\IDE" and hit Enter
  3. Type "tf status /recursive /user:username" and hit Enter
If you'd like to print the output to a text file, you can adjust Step# 3 as follows:

"tf status /recursive /user:username > C:\usernamescheckedoutfiles.txt"

Monday, May 21, 2012

Accessing files contained in the Global Assembly Cache

If you plan on writing any custom code against a SharePoint site, the first thing you're going to need to get your hands on are the SharePoint assembly files that are installed in the GAC (Global Assembly Cache).  Here are the steps to obtain such files:

  1. Log on to the SharePoint web front end server
  2. Open a DOS command prompt (Click Start -> Run, type "cmd", and hit Enter)
  3. Type "subst G: %windir%\assembly"
  4. Open Windows Explorer and navigate to the newly created G: drive
  5. At this point, you have direct access to the .dll files stored in the GAC and you simply have to drill down the folder structures to find what you're looking for
P.S.  If you're looking for Microsoft.SharePoint.dll, it's located under the GAC_MSIL directory...

Sunday, May 20, 2012

Remote Debugging SharePoint Code

If you need to remotely debug the C# code associated with SharePoint web parts, event receivers, etc., here are the steps you can use to make that happen:

Activate the Visual Studio Remote Debugging Monitor


The following steps are used for initiating the Visual Studio remote debugging monitor on your SharePoint web front end server so that a connection may be established between it and your instance of Visual Studio (which will, of course, be located on your workstation):

  1. Log on to your web front end server
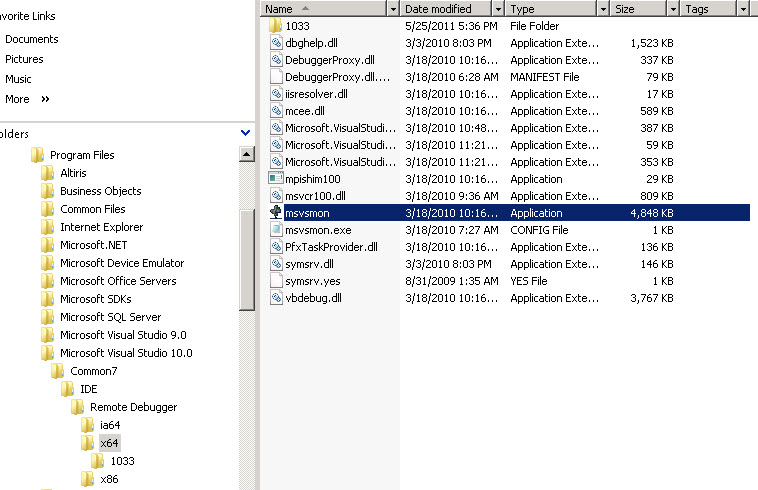
  2. Open Windows Explorer and navigate to the following directory: C:\Program Files\Microsoft Visual Studio 10.0\Common7\IDE\Remote Debugger
  3. If the directory doesn't exist on the server, you can obtain a copy of it from the laptop or desktop upon which Visual Studio 2010 is installed
  4. Once you're in the Remote Debugger directory, double click on the appropriate directory name based on the processor of your web front end server (i.e. x64 is most likely what you'll choose if you're working with SharePoint 2010)
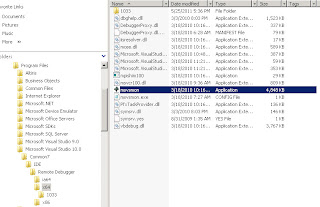
  5. Double click on the msvsmon file
  6. Copy the name of the new server that is started as you'll be using it later when you're ready to attach Visual Studio to your process.  This will be the string that is contained in the Description field as follows:  Msvsmon started a new server name 'CopyThisName'. Waiting...


Deploy Your Assembly and Debug Files to the BIN Directory


If you're solution is currently deployed to the Global Assembly Cache (GAC), you're going to need to temporarily change gears and deploy to your web application's BIN directory due to the fact that the Global Assembly Cache doesn't support .pdb files.  Here the steps you can perform to temporarily change your deployment to the BIN directory:
  1. On your SharePoint web front end server, open Windows Explorer and navigate to your SharePoint web application's directory (C:\inetpub\wwwroot\wss\virtual directories\webapplicationname)
  2. Locate the bin directory and copy all of your SharePoint site's assembly and debug (.dll and .pdb) files into it
  3. Save off a backup copy of your web.config file
  4. Using Notepad, open the web application's web.config file
  5. Locate the <trust> element
  6. Temporarily set the level attribute to read "Full" (i.e. <trust level="Full" originUrl="" />).  
NOTE: Steps# 4 - 6 will allow all files located in the bin directory to be fully trusted as if they were installed in the GAC

Next, you will need to remove your SharePoint site's .dll files from the GAC via the following steps:
  1. Using Windows Explorer, navigate to C:\Windows\Assembly
  2. Locate the first .dll file associated with your SharePoint site
  3. Right-click on the file and select Uninstall
  4. Repeat steps# 2 and 3 for each assembly until all of your SharePoint site .dll files have been removed
  5. In order for the change to take effect, you will need to reset IIS by opening a command prompt and typing "iisreset"


Obtain the Worker Process ID 


The following steps of the process will allow you to (1) verify that your deployment to the bin directory was successful and (2) to launch the worker process that you will be attaching to:
  1. On your workstation, open your web browser and navigate to your SharePoint site
  2. Verify that your site is functioning as expected (this also has the added bonus waking up the SharePoint worker process)
  3. On your SharePoint web front end server, open a command prompt
  4. Type "cd c:\windows\system32\inetsrv"
  5. Type "appcmd list wp"
  6. Identify the appropriate worker process that is associated with the application pool of your SharePoint site
  7. Take note of the ID that is associated with that worker process which will be the numeric value in quotes (i.e.WP "724" (applicationPool:SharePoint - MySharePointSite80))


Attach Visual Studio to the Worker Process


These final step of the process will now allow you to connect your instance of Visual Studio with the remote debugging monitor so that you will, at last, be able to step through the C# code of your SharePoint components:
  1. On your workstation, open Visual Studio
  2. Open your SharePoint site's code solution file
  3. Once your solution is loaded, open the appropriate .cs file you wish to debug and place your breakpoint(s)
  4. Click Debug -> Attach to Process...
  5. For Qualifier, update the textbox with the remote debugging server name that you captured in Step# 6 of the Activate the Visual Studio Remote Debugging Monitor section
  6. Select the w3wp.exe process that matches the ID that you recorded in Step# 7 of the Obtain the Worker Process ID section
  7. Click the Attach button


At this point, you will now be able to debug your SharePoint site's C# code as you would any other type of solution.  Wish you the best with your debug efforts and may you squash that bug quickly!

Wednesday, May 9, 2012

Save SQL Server Management Studio Output in a Pipe-Delimited File

In the event that you would like to obtain a pipe-delimited (i.e. '|') output file of data obtained from a query executed in SQL Server Management Studio, here is a quick procedure for making that happen:

If you're using Windows Server 2008 R2:

  1. Click Start -> Control Panel
  2. Click Clock, Language, and Region
  3. Click Change the date, time, or number format
  4. Click the Additional settings... button
  5. In the List separator field, replace ',' with '|'
  6. Click Apply
  7. Click OK
  8. Click OK
  9. Open SQL Management Studio and execute your query
  10. Write click in the Results window and select Save Results As...
  11. Select the appropriate directory path
  12. For File name:, enter an appropriate filename
  13. For Save as type:, select CSV (Comma delimited)
  14. Click Save
  15. You may now open the file in Notepad and confirm that the output is indeed pipe-delimited as opposed to comma-delimited
Once you have the pipe-delimited output you desire, the procedure to reset back to comma delimited is as follows:

  1. Click Start -> Control Panel
  2. Click Clock, Language, and Region
  3. Click Change the date, time, or number format
  4. Click the Additional settings... button
  5. In the List separator field, replace '|' with ','
  6. Click Apply
  7. Click OK
  8. Click OK
The procedures will be slightly different for other MS operating systems, but the concept will be the same.