Over the years, I've periodically encountered an issue in which SharePoint will give you the following error message whenever you attempt to perform some simple write, update, or delete operations on a site (i.e. like adding a new list item to a SharePoint list):
Exception from
HRESULT: 0x80131904
In my experience, this error message is indicating that SharePoint is not able to write information to the content database and the most common cause that I've encountered is that the location where SQL logs are stored has run out of drive space (i.e. this being the SQL server that hosts the SharePoint content database). Typically, we've either deleted the older SQL transaction logs stored here or simply moved them to another location with more drive space (i.e. archive) in order to free up space on that drive location. Once that delete/move operation of the log files is complete and more drive space is available, the SharePoint environment will return to normal operation immediately.
Showing posts with label SharePoint 2007. Show all posts
Showing posts with label SharePoint 2007. Show all posts
Thursday, September 12, 2013
Tuesday, July 2, 2013
Obtain all files contained under folders and subfolders within a SharePoint Document Library
If you are looking for a way to programmatically return all documents of a specific content type located within a given SharePoint Document Library regardless of whether they are contained in folders and subfolders within the given library, I've provided the following sample method that will allow you to do just that:
The key to this code being able to return all documents, including documents contained under folders and subfolders, is that I've set the ViewAttributes property to be Scope="RecursiveAll". Without this particular setting, the query would have only returned items that were located immediately under the SharePoint Document Library and would have skipped any documents contained under folders and subfolders.
private SPListItemCollection GetDocumentsByContentType(SPList docLibrary, string contentTypeName)
{
    SPQuery query = new SPQuery();
    query.ViewAttributes = "Scope=\"RecursiveAll\"";
    SPListItemCollection documents = null;
    try
    {
        query.Query = string.Format("<where><eq><fieldref name="ContentType"><value type="Text">{0}</value></fieldref></eq></where>", contentTypeName);
        documents = docLibrary.GetItems(query);
    }
    catch (Exception ex)
    {
        throw ex;
    }
    return documents;
}
The key to this code being able to return all documents, including documents contained under folders and subfolders, is that I've set the ViewAttributes property to be Scope="RecursiveAll". Without this particular setting, the query would have only returned items that were located immediately under the SharePoint Document Library and would have skipped any documents contained under folders and subfolders.
Wednesday, March 27, 2013
Programmatically determine if a web-scoped feature has been activated
This may be of limited use, but if you're ever looking for a way to programmatically determine if a web-scoped feature has been activated on a given SharePoint site, here is a quick method you can use to obtain that information:
private bool IsFeatureActivated(Guid siteId, Guid webId, Guid featureId)
{
    bool isFeatureActivated = false;
    using (SPSite site = new SPSite(siteId))
    {
        using (SPWeb web = site.OpenWeb(webId))
        {
            if (web.Features[featureId] != null)
            {
                isFeatureActivated = true;
            }
        }
    }
    return isFeatureActivated;
}
Monday, March 11, 2013
View the XML data behind a Search Core Results Web Part
If you wish to view the raw XML data that is associated with a Search Core Results or People Search Core Results web part, you can do so via the following steps:
- Open IE and navigate to the page that contains the given Core Results web part
- Select Site Actions -> Edit Page
- Click on your web part's menu and select Edit Web Part
- Expand Display Properties and click on the XSL Editor... button
- In the Text Editor window, copy the existing XSL to a temporary location since you'll probably need it again. Here is a possible option for you:
- Hit Ctrl+a to highlight all of the content
- Hit Ctrl+c to save the content
- Open Notepad
- Hit Ctrl+v to past the content to Notepad
- Return to the Text Editor window, hit Ctrl+a, and hit Delete
- Copy and paste the following XSL code into the Text Editor window:
- Click Save
- Click OK
- Return to the parent Search page and enter a valid search parameter
<?xml version="1.0" encoding="UTF-8"?> <xsl:stylesheet version="1.0" xmlns:xsl="http://www.w3.org/1999/XSL/Transform"> <xsl:output method="xml" version="1.0" encoding="UTF-8" indent="yes"/> <xsl:template match="/"> <xmp><xsl:copy-of select="*"/></xmp> </xsl:template> </xsl:stylesheet>
Tuesday, February 26, 2013
Programmatically assign a SharePoint user to a "Person or Group" column in a SharePoint list
Here is some sample code that demonstrates how you can assign a given SharePoint user to a "Person or Group" column or field (in this case, I have a custom "Person or Group" field called "Owner") contained within a SharePoint list:
using Microsoft.SharePoint;
using Microsoft.SharePoint.Administration;
...
Guid siteId = new Guid("GuidOfSiteCollection");
Guid webId = new Guid("GuidOfSite");
Guid listId = new Guid("GuidOfList");
string itemTitle = "My Item's Title";
string userName = "Domain//UserName";
using (SPSite site = new SPSite(siteId))
{
using (SPWeb web = site.OpenWeb(webId))
{
// Find all list items that match your search criteria
SPQuery query = new SPQuery();
query.Query = string.Format("{0}
As you can tell, this is a super-simplified version of some actual code that I've got working. Naturally, you will want to organize this code to better suit your needs (as well as add some exception handling), but the purpose of this example is to show you the basics of how it's done. Enjoy!
Thursday, January 31, 2013
List of "illegal" characters that cannot be included in a SharePoint file name
I've been working on a utility that our team is going to leverage for rapidly uploading a ton of existing Policy and Procedure documents from file shares into a SharePoint site (by the way, this includes defining the relevant document metadata which is why we aren't simply copying the files over). During my investigation, I happened to notice that many of the file names in the file share contain characters that SharePoint is not going to like at all (i.e. '&' is the leading offender). In case you're curious what these "illegal" characters are for file names, here is a complete list:
The source of this information is the following link: http://support.microsoft.com/kb/905231
If you're looking for a solution to this problem, one option is to use the code that I created in one of my previous posts that will allow you to rename the file as you're adding to to your document library: Remove special characters from a string using Regular Expression
- Tilde
- Number sign
- Percent
- Ampersand
- Asterisk
- Braces
- Backslash
- Colon
- Angle brackets
- Question mark
- Slash
- Pipe
- Quotation mark
The source of this information is the following link: http://support.microsoft.com/kb/905231
If you're looking for a solution to this problem, one option is to use the code that I created in one of my previous posts that will allow you to rename the file as you're adding to to your document library: Remove special characters from a string using Regular Expression
Tuesday, January 22, 2013
Programmatically obtain a list of SharePoint Web Applications located under a SharePoint Farm
If you ever need to programmatically obtain a list of web applications contained under your SharePoint Farm, here is some code that will do just that...
NOTE: In this particular instance, I'm writing my list of web applications to a combo box control of a Windows application. The idea is that this combo box control will be the first of several chained combo boxes that will allow you to dive deeper into the SharePoint objects based on the items selected in the combo box controls (i.e. Web Application -> Site Collection -> Site -> Document Library -> Document). Perhaps this my inspire some ideas of how or why this code would be useful.
SPSecurity.RunWithElevatedPrivileges(delegate()
{
    SPFarm farm = SPFarm.Local;
    SPWebService service = farm.Services.GetValue("");

    foreach (SPWebApplication webApp in service.WebApplications)
    {
        // The following code will need to be changed depending on your situation
        ComboBoxItem webAppItem = new ComboBoxItem(webApp.DisplayName, webApp.Id);
        cbWebApp.Items.Add(webAppItem);
    }
});
NOTE: In this particular instance, I'm writing my list of web applications to a combo box control of a Windows application. The idea is that this combo box control will be the first of several chained combo boxes that will allow you to dive deeper into the SharePoint objects based on the items selected in the combo box controls (i.e. Web Application -> Site Collection -> Site -> Document Library -> Document). Perhaps this my inspire some ideas of how or why this code would be useful.
Tuesday, January 15, 2013
A solution for providing a "sum" operation on a calculated field in a SharePoint view
One of our site owners recently ran into a situation in which he was trying to create a SharePoint view that would provide a sum of all values contained within a calculated field, but was not able to do so via the simple configuration process. By "simple configuration" process, I'm referring to the typical way that you would provide a sum on a standard number or currency field which would be to place your view in edit mode, scroll down to and then expand the Totals group, locate your field, select the "Sum" operation listed in the drop down control, and save the change to your view. Unfortunately, this isn't possible for calculated fields due to the fact that calculated fields don't show up under the Totals group. With this in mind, a few possible solutions that would provide the requested functionality are listed as follows:
After a discussion with the user about the requirements for this effort as well as the various options available, we came to the conclusion that it would be possible to use a simple, one-time solution to meet the needs of his effort. In light of this, we chose the workflow option and decided to add our workflow to the list using SharePoint Designer. If you're interested in this solution, here are the steps we took to make this happen:
Replace the calculated field with a standard number or currency field
- Use a Content Query Web Part to host the XSLT code that would generate the desired view
- Use SharePoint Designer to modify the XSLT code of the view directly. In SharePoint 2007, you would do this by inserting a Data View web part and modifying the XLST of that web part.
- Change the calculated field to a regular number or currency field, add a workflow to the list that would perform the calculations previously associated with the calculated field, and place a sum operation on the field
After a discussion with the user about the requirements for this effort as well as the various options available, we came to the conclusion that it would be possible to use a simple, one-time solution to meet the needs of his effort. In light of this, we chose the workflow option and decided to add our workflow to the list using SharePoint Designer. If you're interested in this solution, here are the steps we took to make this happen:
Replace the calculated field with a standard number or currency field
- Using your browser, open the site and navigate to the list to be modified
- Under List Tools, click on the List tab
- Click on List Settings
- Under Columns, locate your calculated field and click on it's link
- Record the formula for your calculation
- Click Delete to remove the column
- Click on Create column
- For Column name:, enter the name of the original calculated field that you just deleted
- Select either the Number or Currency radio button depending on which you require
- Click OK
Create and publish the calculation workflow using SharePoint Designer
- Open Microsoft SharePoint Designer 2010
- Click Open Site
- For Site Name:, enter the URL of the site your list is contained under
- Click Open
- Under Navigation, click on Lists and Libraries
- Click on the list you wish to perform the calculations on
- Under Workflows, click on the New... icon
- Add an appropriate Title and Description for you workflow
- Click OK
- Once the Workflow Designer appears, click on the Action button
- Under Core Actions, select Do Calculation
- Click on the first value link
- Click on the function icon
- For Data source:, select Current Item
- For Field from source:, select your first field that is part of the calculation
- Click OK
- Click on the plus link and choose the appropriate option for your calculation
- Click on the second value link
- Click on the function icon
- For Data source:, select Current Item
- For Field from source:, select your second field that is part of the calculation
- Click OK
- Click on the Action button
- Scroll down to List Actions and click on Set Field in Current Item
- Click on the field link and select the field you just created previously that replaced the original, calculated field
- Click on the value link
- Click on the function icon
- For Data source:, select Workflow Variables and Parameters
- For Field from source:, select the Variable: calc item
- Click OK
- If needed, continue adding calculation steps until the workflow is complete
- Click the Save button
- Under Navigation, click on Workflows
- Click on the link associated with your newly created workflow
- Under Start Options, remove the check from the Allow this workflow to be manually started option
- Place a check in both the Start workflow automatically when an item is created and Start workflow automatically when an item is changed options
- Click the Save button
- Click the Publish button
Update your view to provide a sum on the new field
- Using your browser, open the site and navigate to the list to be modified
- Under List Tools, click on the List tab
- Click on List Settings
- Under Views, locate your view and click on it's link
- Scroll down to and then expand the Totals group
- Locate your new field and select the "Sum" operation listed in the drop down control
- Click Save
With these steps complete, the new "calculated" field will be updated by the workflow every time a list item is created or modified. NOTE: Users will be able to enter values into the "calculated" field; however, the workflow will ultimately override this value when the items is created or saved. At this point, you will now have a "sum" operation on your "calculated" field.
Tuesday, October 16, 2012
Good technique for programmatically deleting items from SharePoint collections
If you're attempting to delete items from a SharePoint collection (i.e. this could include containers such as lists, groups, document libraries, workflow collections, etc), you'll often encounter a situation where you'll need to iterate through a given collection in order to find the appropriate item (i.e. using a "for" or "foreach" loop) and then delete that specific item. Now, if you happen delete an item from the collection while you're iterating through it, your code will thrown an error message that will stop the process dead in its tracks due to the fact that you've actually changed the contents of the collection while your also in the process of looping through the contents. Here is an example scenario in which I'm attempting to remove a given task list called "Expired Items Tasks" from a site:
This code will throw an error (i.e. often times "Collection was modified; enumeration operation may not execute") on the next iteration of the loop that takes place after you're deleted the selected item and will stop the process dead in it's tracks. For your code to properly handle this scenario, a good strategy will be to temporarily store the specific object(s) targeted for deletion in a generic list until you've completed iteration process. Once you've completed your review of the collection, you can then delete those objects at your liesure:
Correct Code:
Anyway, I've run into this scenario on many occasions with other .NET code; however, I've found this scenario to be more prevalent in SharePoint due to the fact that most objects contained within it are collections. Hope this helps!
Incorrect Code:
foreach (SPList expiredItemTaskList in web.GetListsOfType(SPBaseType.GenericList))
{
    if (expiredItemTaskList.Title == "Expired Item Tasks")
    {
        expiredItemsTaskList.Delete();
    }
}
Correct Code:
List<SPList> listsToDelete = new List<SPList>();
foreach (SPList expiredItemTaskList in web.GetListsOfType(SPBaseType.GenericList))
{
    if (expiredItemTaskList.Title == "Expired Item Tasks")
    {
        listsToDelete.Add(expiredItemTaskList);
    }
}

foreach (SPList expiredItemsTaskList in listsToDelete)
{
    expiredItemsTaskList.Delete();
}
Anyway, I've run into this scenario on many occasions with other .NET code; however, I've found this scenario to be more prevalent in SharePoint due to the fact that most objects contained within it are collections. Hope this helps!
Wednesday, August 22, 2012
Need to remove a problem web part?
If you've ever run into a situation in which a web part isn't working properly and is causing your web page to error out in such a way that it prevents you from being able to access/edit the page so that you can remove the offending web part (the InfoPath web part is notorious for this problem), here is a quick solution:

- Navigate to the web page on which the offending web part is installed
- Append the following text to the end of your URL in your browser's address window: "?contents=1"
- Hit Enter to refresh the browser
You will now be presented with the Web Part Page Maintenance view which will allow you to review a list of installed web parts and, potentially, close or remove the offending web part. Here are the quick steps you can use to remove the web part:
- Review the list of web parts and place a check in the check box next to the offending web part
- Click the Delete link

Your web part will now be removed from the page so that you can attempt to perform a fresh install of the web part or, at the very least, allow your users to access the given page while you are given some time to figure out what went wrong with it.
Tuesday, July 17, 2012
Programatically modify a SharePoint List Item
The following code sample code provides a means for being able to perform actions on a list item in one of your SharePoint List or Document Library. In this particular instance, I'm reviewing a specific item in a Document Library and performing an action that is dependent on the Check Out status of the associated file:
using Microsoft.SharePoint;

...

Guid siteId = new Guid(...);
Guid webId = new Guid(...);
Guid listId = new Guid(...);
Guid listItemId = new Guid(...);

using (SPSite site = new SPSite(siteId))
{
    using (SPWeb web = site.OpenWeb(webId))
    {
        SPList list = web.Lists[listId];
        SPListItem listItem = list.Items[listItemId];

        web.AllowUnsafeUpdates = true;
        if (listItem.File.CheckOutType.Equals(SPFile.SPCheckOutType.None))
        {
            // Perform the action associated with the file being checked in...
        }
        else
        {
            // Perform the action associated with the file being checked out...
        }
        listItem.Update();
        web.AllowUnsafeUpdates = false;
    }
}
Wednesday, June 27, 2012
Create a Visual Web Part that displays the entire SharePoint site structure of a SharePoint web application
In the following code sample, I've created a Visual Web Part that will display the entire site structure contained under the parent SharePoint Web Application. This web part will display all sites despite the fact that the given user may not have access to all of the sites beneath the structure. Naturally, unauthorized users won't be able to access the site when he/she clicks on the link, but they will at least be aware of its existence and can contact the SharePoint Admin in order to request access. For this web part, I've chosen to use a Tree View control for displaying the structure, but feel free to get creative if you like. By the way, I've also added a method, SetCurrentNodeFont, here that can be used for highlighting the SharePoint site under which the web part is installed. Last but not least, I've removed my error handling code in order to simplify things a bit so be sure to include or suffer the consequences...
Here is the code:
ASCX File
ASCX.CS File
Here is the code:
ASCX File
<asp:TreeView ID="treeViewSiteNav" runat="server">
</asp:TreeView>
ASCX.CS File
using System;
using System.Web.UI;
using System.Web.UI.WebControls;
using System.Web.UI.WebControls.WebParts;
using Microsoft.SharePoint;
using Microsoft.SharePoint.WebControls;
using Microsoft.SharePoint.Administration;

protected void Page_Load(object sender, EventArgs e)
{
    treeViewSiteNav.Nodes.Clear();
    SPSecurity.RunWithElevatedPrivileges(delegate()
    {
        // Display the entire navigation structure of the web application
        SPSiteCollection sites = SPContext.Current.Site.WebApplication.Sites;
        foreach (SPSite currentSite in sites)
        {
            MapCurrentSiteCollection(currentSite.ID, currentSite.RootWeb.ID);
            currentSite.Dispose();
        }
    });
}


private void MapCurrentSiteCollection(Guid siteId, Guid webId)
{
    // Creating a new instance of the site because the currentSite is associated with the context of the
    // user whereas this new instance will run with elevated privileges
    using (SPSite site = new SPSite(siteId))
    {
        site.CatchAccessDeniedException = false;
        using (SPWeb currentWeb = site.OpenWeb(webId))
        {
            TreeNode siteNode = new TreeNode(currentWeb.Title, null, null, currentWeb.Url, "_self");
            SetCurrentNodeFont(ref siteNode, SPContext.Current.Web.ID, currentWeb.ID);
            treeViewSiteNav.Nodes.Add(siteNode);
            foreach (SPWeb web in currentWeb.Webs)
            {
                AddWebNodes(web, siteNode);
                web.Dispose();
            }
        }
    }
}

private void SetCurrentNodeFont(ref TreeNode node, Guid currentWebId, Guid evaluatedWebId)
{
    if (currentWebId == evaluatedWebId)
    {
        node.Text = Server.HtmlDecode(string.Format("<b>{0}</b>", node.Text));
    }
}
Wednesday, June 20, 2012
Automatically activate a web or site scoped feature during site creation
I know of two good techniques for automatically activating a web or site scoped feature when a new SharePoint site is created and they are (1) if you're using a custom site definition, to insert a new <Feature> node within either the <SiteFeatures> or <WebFeatures> node of the ONET.xml file and (2) utilize a technique called Feature Stapling to attach your feature to a given site definition.
In both instances, you will need to know the ID, Title, and Scope of you feature. These can be found by opening your feature's Feature.xml file and locating the appropriate attributes of the <Feature> node. Here is a simplified example of what you might find in a sample Feature.xml file:
ONET.XML Update
This technique should only be used if your site is based on a custom site definition that you or your team created (i.e. that's the case if you have a custom ONET.xml file in your solution). NOTE: You change will likely be overwritten with a service pack installation. With that said, the basic premise of this technique is to insert a new <Feature> node within either the <SiteFeatures> or <WebFeatures> node of the ONET.xml file which can be accomplished as follows:
In both instances, you will need to know the ID, Title, and Scope of you feature. These can be found by opening your feature's Feature.xml file and locating the appropriate attributes of the <Feature> node. Here is a simplified example of what you might find in a sample Feature.xml file:
<?xml version="1.0" encoding="utf-8"?>
<Feature xmlns="..." Title="My Feature" Description="..." Id="b68c860b-b368-4e5f-ae06-dcfbfbd9c8da" ReceiverAssembly="..." Scope="Web"></Feature>
This technique should only be used if your site is based on a custom site definition that you or your team created (i.e. that's the case if you have a custom ONET.xml file in your solution). NOTE: You change will likely be overwritten with a service pack installation. With that said, the basic premise of this technique is to insert a new <Feature> node within either the <SiteFeatures> or <WebFeatures> node of the ONET.xml file which can be accomplished as follows:
- Open your ONET.xml file using Visual Studio or Notepad
- Locate the <SiteFeatures> or <WebFeatures> node depending on the scope of the feature
- Create a new <Feature> node and add the appropriate ID and Name attributes
- Save the changes
In this example, I will use the details from my sample feature:
Feature Stapling
This technique is the only approach that I know of for automatically activating a feature on a standard SharePoint site template. In this case, you will be creating a new Farm level feature that, when activated, will "staple" your feature to all sites that reference the specified template. Here is an example of the "stapling" feature code that will be contained in a new Feature.xml file:
and here is some sample code that will be contained in the references staple.xml file that will automatically launch the specified feature on the standard SharePoint Team Site template:
<Project>
   <Configurations>
      <Configuration>
         <SiteFeatures />
         <WebFeatures>
            <Feature ID="b68c860b-b368-4e5f-ae06-dcfbfbd9c8da" Name="My Feature" />
         </WebFeatures>
      </Configuration>
   </Configurations>
</Project>
Feature Stapling
This technique is the only approach that I know of for automatically activating a feature on a standard SharePoint site template. In this case, you will be creating a new Farm level feature that, when activated, will "staple" your feature to all sites that reference the specified template. Here is an example of the "stapling" feature code that will be contained in a new Feature.xml file:
<?xml version="1.0" encoding="utf-8" ?>
<Feature Id="7ac7f1e9-1c6a-4ff0-a2bc-0d81e2360b70"
    Title="Feature Staple Sample"
    Description="Staple the associated feature(s) to the specified site definition(s)"
    Version="1.0.0.0"
    Hidden="FALSE"
    Scope="Farm"
    xmlns="http://schemas.microsoft.com/sharepoint/">
   <ElementManifests>
      <ElementManifest Location="staple.xml" />
   </ElementManifests>
</Feature>
and here is some sample code that will be contained in the references staple.xml file that will automatically launch the specified feature on the standard SharePoint Team Site template:
<Elements xmlns="http://schemas.microsoft.com/sharepoint/">
   <FeatureSiteTemplateAssociation Id="b68c860b-b368-4e5f-ae06-dcfbfbd9c8da" TemplateName="STS#0" />
</Elements>
Friday, June 15, 2012
Feature that can be used to control the list of available web templates
If you would like to control the list of possible web templates that are available on a SharePoint site to users who are authorized to add sites, I'd like to present some code that you can add to a feature that will allow you to adjust the list of possible options. In case you aren't certain what I mean by these available web templates, you can view this list by navigating to your SharePoint site and clicking on Site Actions -> New Site and you will be presented with a list of possible templates to choose from.
In the code sample below, activating the feature will remove all possible web templates with the exception of the standard Document Workspace template from the display list. Deactivating the feature will allow the list of options to return to its normal mode of displaying all web templates:
In the code sample below, activating the feature will remove all possible web templates with the exception of the standard Document Workspace template from the display list. Deactivating the feature will allow the list of options to return to its normal mode of displaying all web templates:
public override void FeatureActivated(SPFeatureReceiverProperties properties) { try { SPWeb web = properties.Feature.Parent as SPWeb; // Hide all available web templates with the exception of the Document Center web template SPWebTemplateCollection currentTemplates = web.GetAvailableWebTemplates(1033); CollectionnewTemplates = new Collection (); foreach (SPWebTemplate currentTemplate in currentTemplates) { if (currentTemplate.Title.Trim() == "Document Workspace") { newTemplates.Add(currentTemplate); } } web.SetAvailableWebTemplates(newTemplates, 1033); web.Update(); } catch (Exception ex) { System.Diagnostics.Debug.WriteLine(ex.ToString()); } } public override void FeatureDeactivating(SPFeatureReceiverProperties properties) { try { SPWeb web = properties.Feature.Parent as SPWeb; // Show all available web templates web.AllowAllWebTemplates(); web.Update(); } catch (Exception ex) { System.Diagnostics.Debug.WriteLine(ex.ToString()); } }
Friday, May 25, 2012
PDF icon not displayed on your SharePoint site
If you've recently set up your SharePoint farm and noticed that a generic icon is being displayed for the PDF files in your document libraries, here are a few steps that you can use to add that icon to your farm:
NOTE: For SharePoint 2007, you'll need to make the following minor modifications to the steps above:
- Open IE and access the following link to obtain an official copy of the small, 16x16 Adobe logo, pdficon_small.png: http://www.adobe.com/misc/linking.html
- Log on to your SharePoint web front end server
- Open Windows Explorer and navigate to the C:\Program Files\Common Files\Microsoft Shared\Web Server Extensions\14\TEMPLATE\IMAGES directory
- Copy the pdficon_small.png file to this location
- Navigate to the C:\Program Files\Common Files\Microsoft Shared\Web Server Extensions\14\TEMPLATE\XML directory and locate the DOCICON.xml file
- Open the DOCICON.xml file with Notepad
- In the <ByExtension> node, add the following line: <Mapping Key="pdf" Value="pdficon_small.png" />
- You'll need to reset IIS for the changes to take effect:
- Open a command prompt
- Type "iisreset"
- Hit Enter
NOTE: For SharePoint 2007, you'll need to make the following minor modifications to the steps above:
- For Step# 3, use C:\Program Files\Common Files\Microsoft Shared\Web Server Extensions\12\TEMPLATE\IMAGES instead
- For Step# 5, use C:\Program Files\Common Files\Microsoft Shared\Web Server Extensions\12\TEMPLATE\XML instead
Monday, May 21, 2012
Accessing files contained in the Global Assembly Cache
If you plan on writing any custom code against a SharePoint site, the first
thing you're going to need to get your hands on are the SharePoint assembly
files that are installed in the GAC (Global Assembly Cache). Here are the steps
to obtain such files:
- Log on to the SharePoint web front end server
- Open a DOS command prompt (Click Start -> Run, type "cmd", and hit Enter)
- Type "subst G: %windir%\assembly"
- Open Windows Explorer and navigate to the newly created G: drive
- At this point, you have direct access to the .dll files stored in the GAC and you simply have to drill down the folder structures to find what you're looking for
Sunday, May 20, 2012
Remote Debugging SharePoint Code
If you need to remotely debug the C# code associated with SharePoint web parts, event receivers, etc., here are the steps you can use to make that happen:
Activate the Visual Studio Remote Debugging Monitor
The following steps are used for initiating the Visual Studio remote debugging monitor on your SharePoint web front end server so that a connection may be established between it and your instance of Visual Studio (which will, of course, be located on your workstation):

Deploy Your Assembly and Debug Files to the BIN Directory
If you're solution is currently deployed to the Global Assembly Cache (GAC), you're going to need to temporarily change gears and deploy to your web application's BIN directory due to the fact that the Global Assembly Cache doesn't support .pdb files. Here the steps you can perform to temporarily change your deployment to the BIN directory:
Obtain the Worker Process ID
The following steps of the process will allow you to (1) verify that your deployment to the bin directory was successful and (2) to launch the worker process that you will be attaching to:
Attach Visual Studio to the Worker Process
These final step of the process will now allow you to connect your instance of Visual Studio with the remote debugging monitor so that you will, at last, be able to step through the C# code of your SharePoint components:


At this point, you will now be able to debug your SharePoint site's C# code as you would any other type of solution. Wish you the best with your debug efforts and may you squash that bug quickly!
Activate the Visual Studio Remote Debugging Monitor
The following steps are used for initiating the Visual Studio remote debugging monitor on your SharePoint web front end server so that a connection may be established between it and your instance of Visual Studio (which will, of course, be located on your workstation):
- Log on to your web front end server
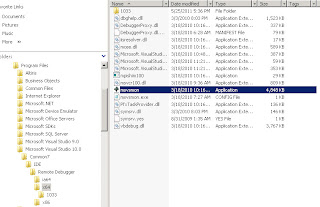
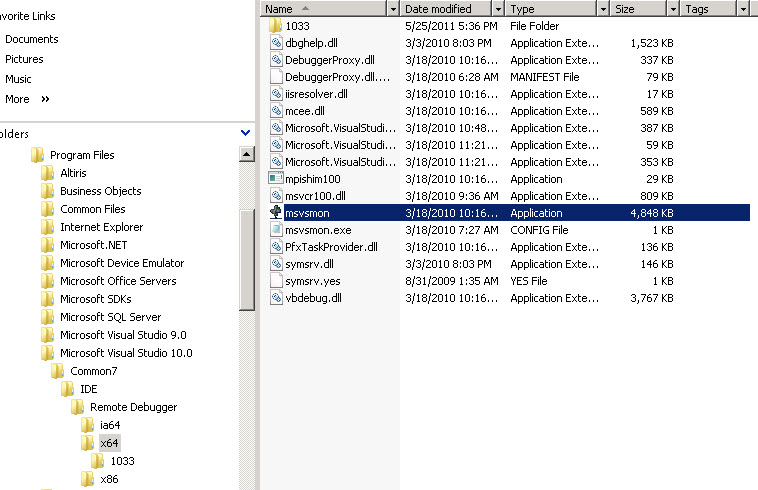
- Open Windows Explorer and navigate to the following directory: C:\Program Files\Microsoft Visual Studio 10.0\Common7\IDE\Remote Debugger
- If the directory doesn't exist on the server, you can obtain a copy of it from the laptop or desktop upon which Visual Studio 2010 is installed
- Once you're in the Remote Debugger directory, double click on the appropriate directory name based on the processor of your web front end server (i.e. x64 is most likely what you'll choose if you're working with SharePoint 2010)
- Double click on the msvsmon file
- Copy the name of the new server that is started as you'll be using it later when you're ready to attach Visual Studio to your process. This will be the string that is contained in the Description field as follows: Msvsmon started a new server name 'CopyThisName'. Waiting...

Deploy Your Assembly and Debug Files to the BIN Directory
If you're solution is currently deployed to the Global Assembly Cache (GAC), you're going to need to temporarily change gears and deploy to your web application's BIN directory due to the fact that the Global Assembly Cache doesn't support .pdb files. Here the steps you can perform to temporarily change your deployment to the BIN directory:
- On your SharePoint web front end server, open Windows Explorer and navigate to your SharePoint web application's directory (C:\inetpub\wwwroot\wss\virtual directories\webapplicationname)
- Locate the bin directory and copy all of your SharePoint site's assembly and debug (.dll and .pdb) files into it
- Save off a backup copy of your web.config file
- Using Notepad, open the web application's web.config file
- Locate the <trust> element
- Temporarily set the level attribute to read "Full" (i.e. <trust level="Full" originUrl="" />).
Next, you will need to remove your SharePoint site's .dll files from the GAC via the following steps:
- Using Windows Explorer, navigate to C:\Windows\Assembly
- Locate the first .dll file associated with your SharePoint site
- Right-click on the file and select Uninstall
- Repeat steps# 2 and 3 for each assembly until all of your SharePoint site .dll files have been removed
- In order for the change to take effect, you will need to reset IIS by opening a command prompt and typing "iisreset"
Obtain the Worker Process ID
The following steps of the process will allow you to (1) verify that your deployment to the bin directory was successful and (2) to launch the worker process that you will be attaching to:
- On your workstation, open your web browser and navigate to your SharePoint site
- Verify that your site is functioning as expected (this also has the added bonus waking up the SharePoint worker process)
- On your SharePoint web front end server, open a command prompt
- Type "cd c:\windows\system32\inetsrv"
- Type "appcmd list wp"
- Identify the appropriate worker process that is associated with the application pool of your SharePoint site
- Take note of the ID that is associated with that worker process which will be the numeric value in quotes (i.e.WP "724" (applicationPool:SharePoint - MySharePointSite80))
Attach Visual Studio to the Worker Process
These final step of the process will now allow you to connect your instance of Visual Studio with the remote debugging monitor so that you will, at last, be able to step through the C# code of your SharePoint components:

- On your workstation, open Visual Studio
- Open your SharePoint site's code solution file
- Once your solution is loaded, open the appropriate .cs file you wish to debug and place your breakpoint(s)
- Click Debug -> Attach to Process...
- For Qualifier, update the textbox with the remote debugging server name that you captured in Step# 6 of the Activate the Visual Studio Remote Debugging Monitor section
- Select the w3wp.exe process that matches the ID that you recorded in Step# 7 of the Obtain the Worker Process ID section
- Click the Attach button

At this point, you will now be able to debug your SharePoint site's C# code as you would any other type of solution. Wish you the best with your debug efforts and may you squash that bug quickly!
Tuesday, April 17, 2012
Obtaining a List of Users from a SharePoint site via a SQL command
It's only a matter of time before your PM is going to come to you one day and ask you "so...who now has access to that site you set up about a year ago?". Rather than having to root around the various groups and compiling the list by hand, the quick n' dirty solution to this problem is to run the following SQL command against your SharePoint content database. This query will quickly obtain a list of users based on the SharePoint groups they belong which you can then slap it into an Excel spreadsheet for them:
SELECT DISTINCT [Groups].[Title] as 'Group', [UserInfo].[tp_Title] as 'User', [UserInfo].[tp_Email] as 'Email' FROM [Groups] INNER JOIN [GroupMembership] ON [GroupMembership].GroupId = [Groups].ID AND [GroupMembership].SiteID = [Groups].SiteID INNER JOIN [UserInfo] ON [UserInfo].tp_ID = [GroupMembership].MemberId AND [UserInfo].tp_SiteID = [GroupMembership].SiteID ORDER BY [Groups].[Title] ASC, [UserInfo].[tp_Title] ASCBy the way, please don't get the impression that I'm implying that you can write INSERT or DELETE statements against these databases. The minute you do that is the minute that Microsoft will "disown" your SharePoint site and will not be able to provide technical support for it. This information should be considered READ-ONLY to you and you should only add, modify, or delete users using the SharePoint interface.
Wednesday, March 7, 2012
Simple Redirect Web Part
If you need a quick solution for redirecting users from one SharePoint page to another, here is a very simple solution:
- Open your browser to the page of your SharePoint site which you'd like to place the redirect on
- Click on Site Actions -> Edit Page
- Locate the Bottom Zone and click Add a Web Part
- Under Categories, select Media and Content
- Under Web Parts, select Content Editor
- Click the Add button
- Locate the newly added web part and click on the dropdown arrow in the upper right hand corner
- Select the Edit Web Part option
- Under Layout, place a check in the Hidden checkbox
- In the Content Editor web part, click on the link that reads Click here to add new content link
- In the Format Text ribbon, click on the HTML button and select Edit HTML Source
- In the HTML Source dialog, enter the following HTML:
<meta http-equiv="refresh" content="0;url=http://TargetSite/TargetPage.aspx">
- Click OK
- Click OK
- Open your browser, type in the address to the page of your SharePoint site on which you placed the redirect web part, and append "&contents=1" to it (i.e. http://SourceSite/SourcePage.aspx?contents=1)
- Place a check in the checkbox next to the redirect content editor web part you created above
- Click Delete to remove the redirect content editor web part
Wednesday, December 28, 2011
Programmatically search a SharePoint list for a specific items
If you'd like to programmatically search a SharePoint list for specific list items that contain a certain value in one of the lists' fields, the following sample code will allow you to obtain any list items that precisely match the specified criteria:
    string searchValue = "ECM Project";
    using (SPSite site = new SPSite(siteGuid))
    {
        using (SPWeb web = site.OpenWeb())
        {
            SPList projectList = web.Lists["Project List"];
            SPQuery query = new SPQuery();
            query.Query = string.Format("<Where><Eq><FieldRef Name='Title' /><Value Type='Text'>{0}</Value></Eq></Where>", searchValue);
            SPListItemCollection listItems = projectList.GetItems(query);
            web.AllowUnsafeUpdates = true;
            foreach (SPListItem listItem in listItems)
            {
                listItem["Title"] = "Enterprise Content Management Project";
                listItem.Update();
            }
            web.AllowUnsafeUpdates = false;
        }
    }
In this example, I'm performing a search on a custom SharePoint list called "Project List" for any list items that have "ECM Project" for the Title field. Once I find those list items, I replace the Title field with a value of "Enterprise Content Managment Project".
Subscribe to:
Posts (Atom)