Thursday, September 27, 2012

Strategies for implementing a 'Wait Notification' for a long running operation: standard ASP .NET

If you're looking for a good way to inform the users of your ASP .NET web application that processing is actually taking place during a long running process, here is a simple strategy you can use that involves standard ASP .NET.  Now, in order to make this work, you'll need to make three changes to the web page hosting the process which are listed as follows:
  1. Add a <div> tag to your HTML code that will be used for hosting the "Processing..." message or image.  Here is a simple example:

    <div align="center" id="div_ProcessingMessage" runat="server" style="display: none;"><span> Processing... </span></div>

  2. Add a javascript function that displays the above-mentioned <div> when called (NOTE: you could also add code to disable controls that you don't want the user touching in the event of a long running process).  Here is a simple example:

    <script type="text/javascript">
    function EnableProcessingMessage() {
        var test = document.getElementById('div_ProcessingMessage');
        test.style.display = "";
    }
    

  3. Add an "onsubmit" attribute to the <form> tag of your web page that calls the above-mentioned javascript function.  Here is a simple example:

    <form id="form1" runat="server" onsubmit="EnableProcessingMessage()">
After these changes are in place, you can fire up your application and the message or image contained in the <div> tag will pop up in the specified location whenever a postback is triggered on the page.  The longer the process takes, the longer this message will stay visible to the users.  Once the postback operation is complete, the message will be hidden again.

By the way, if you don't want the users clicking on various controls during a long running operation, you can prevent them from doing so by adding code to your javascript method that can temporarily hide or disable those controls.

Now, if you're using AJAX, this strategy won't work so I'll provide you with another solution for that in my next post...

Friday, September 21, 2012

Details on the SharePoint 2010 "Manage Web Site" permission

Our SharePoint Admin was recently trying to dig up some details on exactly what permissions/functionality the Manage Web Site permission provides when reviewing the permissions granted to a given permission level.  The permission itself reads "Grants the ability to perform all administration tasks for the Web site as well as manage content"; however, that doesn't provide the specific details that she was looking for.  Just to be clear on what I'm talking about, you can access the permissions of a given permission level via the following steps:

  1. Log on to the root site of a site collection that you're designated as a site collection administrator of
  2. Click on Site Actions -> Site Permissions
  3. On the ribbon, locate the Manage section and click on Permission Levels
  4. Click on one of the links associated with any permission level
  5. Review the Permissions enumeration located on the right side of the screen
  6. Scroll down to the Site Permissions category
  7. Scroll down to the fourth checkbox and you will see the Manage Web Site permission

Unfortunately, I wasn't able to locate detailed information on what this permission provides so I decided to grind out an answer to her question by simply adding and removing the Manage Web Site permission and comparing the difference between the capabilities that were listed under Site Actions -> Site Settings for a test account that was explicitly granted the permission level I was modifying.  The results of this analysis are presented in the following screen shots:

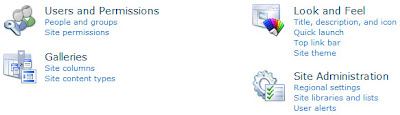
Image#1 - Site Settings without Manage Web Site

Image#2 - Site Settings with Manage Web Site

Based on these results, the Manage Web Site permission provides the following capabilities:
  • Look and Feel
    • Tree view
      • Ability to adjust whether the Quick Launch is enabled/disabled
      • Ability to enable/disable a Tree View to aid navigation
  • Galleries
    • Master pages
      • Access to the Master Page Gallery
  • Site Administration
    • RSS
      • Ability to allow RSS feeds in the site
      • Specify site-wide channel elements for the RSS feeds if enabled
        • Copyright info
        • Managing Editor
        • Webmaster
        • Time To Live (minutes)
    • Search and offline availability
      • Ability to choose whether or not the site appears in search results
      • Specify the indexing behavior associated with site ASPX pages and content
      • Ability to choose whether or not content can be downloaded to offline clients
    • Workflow settings
      • Ability to manage workflows on the site
    • Term store management
      • Ability to specify the Managed Metadata Service of the site as well as control who can manage the associated term store
  • Site Actions
    • Manage site features
      • Ability to active/deactivate site features
    • Reset to site definition
      • Ability to restore the site back to its original site template
    • Delete this site
      • Ability to permanently delete the site
  • Reporting Services
    • Manage Shared Schedules
      • Ability to manage schedule information associated with reports or subscriptions associated with the site
    • Reporting Services Site Settings
      • Ability to modify the default site settings for Reporting Services
        • Enable client-side printing by allowing the RSClientPrint ActiveX control to be available for download from the site
        • Enable local mode error messages to allow error messages to be passed to remote computers when running in local mode
        • Enable accessibility metadata in the HTML output for reports

At this time, I haven't delved deeper into whether or not there are any differences within the functionality that is common between the two cases (i.e. both have the Quick Launch link active under Look and Feel); however, it's entirely possible there could be differences.  For now, this research has provided us with enough information to satisfy our needs; therefore, I'm going to stop here for the moment.  Hope this helps!

Thursday, September 20, 2012

One possible solution to the problem of the StaticSelectedStyle not working

If you run into a situation in which the StaticSelectedStyle property of your asp:Menu control simply isn't working, I have a solution that worked for me and might just work for you.  In my particular case, I have a Menu web control located on the Master Page of my web app and I'm using the following code to define my menu:

...
<asp:Menu ID="mnuMain" CssClass="NavigationMenu"  
    staticdisplaylevels="2" DynamicHorizontalOffset="1"
    staticsubmenuindent="1px" MaximumDynamicDisplayLevels="4"
    orientation="Horizontal" runat="server">
    <StaticHoverStyle CssClass="NavigationMenu_StaticHoverStyle" />
    <StaticMenuItemStyle CssClass="NavigationMenu_ItemStyle" />
    <StaticSelectedStyle CssClass="NavigationMenu_StaticSelectedStyle" />
    <Items>
        <asp:MenuItem NavigateUrl="~/Default.aspx" Text="Review My Groups" />
...

The root cause of my problem with the style of the selected item not being set properly was, ultimately, due to the fact that I wasn't updating the Selected property of the menu item that represents the current page being displayed.  To resolve the issue, I simply added the following code to the PageLoad event of my Master Page, the location where my Menu control resides, to set the Selected property of the menu:
protected void Page_Load(object sender, EventArgs e)
{
    string currentPage = Page.AppRelativeVirtualPath;
    foreach (MenuItem item in mnuMain.Items)
    {
        if (item.NavigateUrl == currentPage)
        {
            item.Selected = true;
        }
    }
}

This code basically tells the Menu which item has been selected and will enable the StaticSelectedStyle property to be applied to the selected menu item.

Friday, September 14, 2012

Programmatically obtain a list of Active Directory groups that an individual is a member of

Here is some sample code that will allow you to obtain a complete list of all of the Active Director groups that a specified user is a member of:

public void GetGroupsUserIsMemberOf(string sAMAccountName)
{
    try
    {
        using (DirectoryEntry dirEntry = new DirectoryEntry())
        {
            dirEntry.Path = "LDAP://OU=OUName,DC=DCName,DC=org";
            dirEntry.AuthenticationType = AuthenticationTypes.Secure;

            using (DirectorySearcher dirSearch = new DirectorySearcher(dirEntry))
            {
                dirSearch.Filter = string.Format("(&(objectCategory=person)(objectClass=user)(SAMAccountName={0}))", sAMAccountName);
                dirSearch.PropertiesToLoad.Add("memberOf");
                SearchResult result = dirSearch.FindOne();
                if (result != null)
                {
                    int propCount = result.Properties["memberOf"].Count;
                    for (int i = 0; i <= propCount - 1; i++)
                    {
                        // Clean up the name of the group for display purposes
                        char[] delim = new char[] { ',', '\\' };
                        string groupName = result.Properties["memberOf"][i].ToString().Split(delim).First().Replace("CN=", string.Empty);
                        Console.WriteLine(string.Format("Group# {0}: {1}", i+1, groupName);
                    }
                }
            }
        }
    }
}

Monday, September 10, 2012

Programmatically obtain user information from Active Directory

Here is a sample method that you can use for contacting Active Directory in order to obtain information about a user based on his/her username/account name (a.k.a. sAMAccountName in AD):

public void GetUserDistinguishedName(string sAMAccountName)
{
    using (DirectoryEntry dirEntry = new DirectoryEntry())
    {
        dirEntry.Path = "LDAP://OU=OUName,DC=DCName,DC=org";
        dirEntry.AuthenticationType = AuthenticationTypes.Secure;

        using (DirectorySearcher dirSearch = new DirectorySearcher(dirEntry))
        {
            dirSearch.Filter = string.Format("(&(objectCategory=person)(objectClass=user)(SAMAccountName={0}))", sAMAccountName);
            SearchResult result = dirSearch.FindOne();
            if (result != null)
            {
                Console.WriteLine(string.Format("Distinguished Name: {0}" ,result.Properties["distinguishedname"][0].ToString()));
                Console.WriteLine(string.Format("First Name: {0}", result.Properties["givenname"][0].ToString()));
                Console.WriteLine(string.Format("Last Name: {0}", result.Properties["sn"][0].ToString()));
                Console.WriteLine(string.Format("Email Address: {0}", result.Properties["mail"][0].ToString()));
            }
        }
    }
}

Thursday, August 30, 2012

Adding the contents of an entire folder into a Visual Studio 2010 project

If you'd like to bulk add the contents of an entire folder into the structure of a Visual Studio 2010 project (i.e. JQuery libraries are a perfect example), you'll soon discover that the Add -> Existing Item... route is not the way you want to go.  A quick solution for bulk adding a folder is to do the following actions:

  1. Open Windows Explorer and navigate to the folder you wish to copy
  2. Right-click on the folder and select Copy
  3. Open the applicable Visual Studio 2010 solution
  4. Select the project you wish to copy the folder to
  5. Navigate to the proper location in the project and right-click on the parent location of the folder
  6. Select Paste
The folder and all of it's sub-folders and files will now be copied into the specified location.  I know this seems like it would be obvious, but I seem to experience a moment of "how did I do that last time?" whenever it's been a while since I've created a solution that requires me to do this.  Good stuff!

Friday, August 24, 2012

Open a SharePoint 2010 List Item dialog via a hyperlink

One of our users was looking for a way to consolidate several links that, when clicked, would open the standard dialog to create a new list item for the associated List located on her SharePoint 2010 site in the same way that the "Add new item" link functions.

The solution we ended up using was introduced by one of my Avanade compatriots in the UK, Phil Childs, and his write up can be found at the following URL: Open list item modal dialog (lightbox) with a hyperlink in SharePoint 2010

The code that highlights one of the many links we added to our Content Editor web part to make this solution work is presented as follows:

<script type="text/javascript">
var optionsCABRequest = {
url: "http://SiteUrl/_layouts/listform.aspx?PageType=8&ListId={GuidOfOurSharePointList}&RootFolder=",
    title: "Create a new CAB Request",
    allowMaximize: true,
    showClose: true,
    width: 735,
    height: 580,
    dialogReturnValueCallback: silentCallback};
function openNewCABRequestForm() {SP.UI.ModalDialog.showModalDialog(optionsCABRequest);}
function silentCallback(dialogResult, returnValue) {
}
function refreshCallback(dialogResult, returnValue) {
  SP.UI.Notify.addNotification('Operation Successful!');
  SP.UI.ModalDialog.RefreshPage(SP.UI.DialogResult.OK);
}
</script>
<br/>
<div>Click <a href="javascript:openNewCABRequestForm()">here</a> to create a new CAB Request</div>

Our thanks definitely goes to Phil for creating and sharing this solution. It worked perfectly for what our user was trying to accomplish.  Thanks, Phil!